Showing posts with label polemos. Show all posts

Friday, 27 September 2013

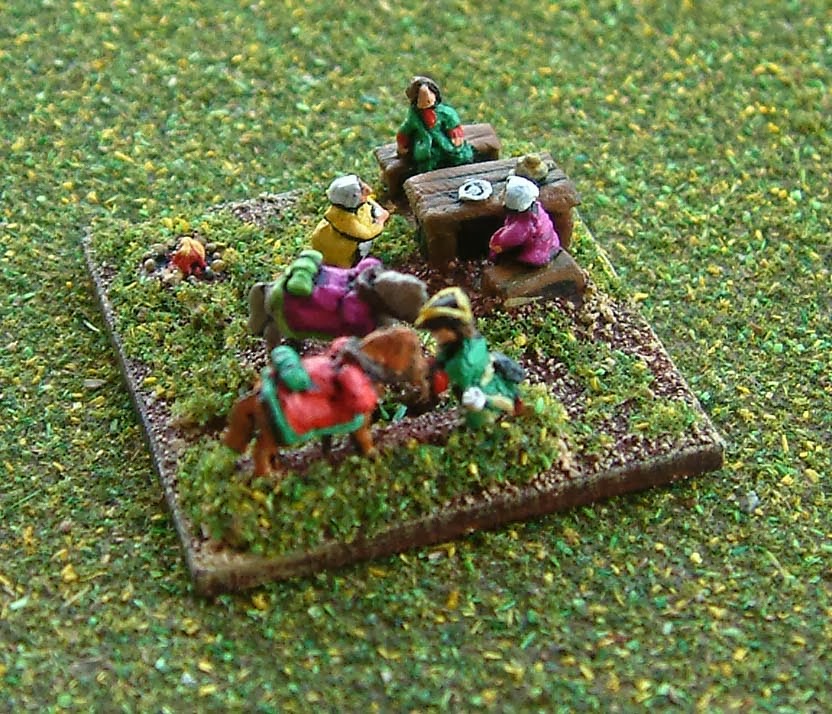
How The Picnic War started

"Sir, I think you should look at this?"
"What is it, Svensson?"
"Sir, it appears to be Miss van Frufru."
"Egad, what's she doing here? Hand me my telescope."
All figures by Baccus 6mm
"By gad, Svensson, that's not just my Fifi. That's Count Ivan Bigunov too. And they appear to be having a picnic. Oh the poor girl. With what horrors has the threatened her that she sits there so quietly and makes no attempt to ride away? He must have lain in wait for her to be so prepared that he can lay on a picnic so replete with food. See, Svensson, how she takes a bite of his sausage, so unwillingly, and yet she chokes it down, for she is helpless in his clutches. See how Madame Cunegonde, Miss van Frufru's maid, must serve both the vile Count and my Fifi. See how Fifi must drink his vile wine and sample all the viands he has placed in front of her. She does well to give him no cause to strike her or worse. Oh, my Fifi, how brave you are to sit there so stoically. How courageously you fend off his detestable advances ... but wait ... what is this? Oh dear God, no! It cannot be! But I see with my own eyes that it is true. He ... has ... bagpipes! Will he now play the bagpipes with my Fifi? Alas, it must be so."

"Svensson, inform the army that we are no longer on exercise. We must to war for the honour of my poor Fifi, before the despicable Count can force her to learn to play the bagpipes."

My enthusiasm for eighteenth-century wargames, and indeed my painting mojo, which has languished for most of this year, has been rekindled by a game of Polemos the other day. We also plan to play Maurice, which requires me to have an objective marker. I looked online to see what others had done, and checked my ULP for suitable figures. In the end I resolved to do a picnic scene with the poor Miss Fifi van Frufru being serenaded by the foul, warty Count Ivan Bigunov. This is the result. It uses an early eighteenth century horseholder from a dragoons pack and some figures from one of the camp packs.


Tuesday, 23 June 2009

The Battle of Hälsingborg, 1710 - The Swedish Army

On 10th March 1710, the Swedish army marched on Hälsingborg fuelled only with a shot of schnapps that morning. It was a frosty day, which worked to the Swedes' advantage, for that meant that the marshes and bogs along their line of march ceased to be serious obstacles to their progress. The Danish army was deployed north of Hälsingborg but the Swedish approach march was aimed at their flank so the Danes had to quickly redeploy, leaving most of their artillery behind.

About ten years ago I decided that I wanted to refight this battle. Don't ask me why, because I have no idea why this particular battle became the focus of my efforts. I had been looking at the Baccus 6mm Great Northern War ranges and decided to make a large purchase, my first from Mr Berry. I then set to painting the figures and doing background research. I found Dan Schorr's excellent Northern Wars website, and also Nick Dorrell's work on the same subject. Communications with Dan Schorr led to him sending me a copy of the Danish General Staff's description of the battle, which still languishes half-translated on my hard drive. One day I shall finish the translation but in the meantime I have read it through a few times and been able to apply what I knew to the production of my armies.

Having bought vast quantities of 6mm figures, I needed a set of rules. I had played Koenig Krieg before and liked them. I also had Volley and Bayonet, which I also enjoyed. I opted to produce my armies for Koenig Krieg. What I fool! Had I but realised, I might have had this project completed ere now by simply opting for Volley and Bayonet. So, I painted all the figures and dutifully began building terrain. Unfortunately, the project lapsed and languished not forgotten but merely shelved, because my opponent moved away and I had no one enthusiastic about the project to keep me interested in finishing it.

And so we return to the present. Followers of this blog will have read my reviews of Polemos: GNW, so you will have seen that Steve, my regular opponent, is foolish enough to have shown some interest in this period. Bwa ha ha ha ha! As a result, I have stuck all of my figures on bases to a Polemos standard, which will also work for Volley and Bayonet. I have just completed the rebasing process for the Swedish army, so here is the full Swedish army according to the order of battle in Polemos: GNW. A Volley and Bayonet version of the same army would be about half this size. I have posted more pictures of this army on my Photobucket account. Although I have not photographed them, each regiment has a full set of casualty markers in its own colours too. How sad is that?

The Swedish Army at Hälsingborg (click the pictures for larger versions):


Jönköpings regemente:


Smålands och Östgöta femmänningsregemente till fot:


Östgöta kavalleriregemente:


Along the way, I appear to have successfully managed to paint a whole pile of extra bits too. Some of these are versions of the infantry regimentes in the main army, but with pikes, while others are spare bits as a result of the change of order of battle caused by using different rules. The vast amount of artillery is brought about by a general feeling that I wanted it.


And finally, if you have been interested enough to read this far, I shall work up a scenario for this battle at some point in the near future and post it here. I also need to do the basing on the Danish army, so that will be one of my next projects. With that done, perhaps I can turn my attention to finishing the terrain. Fortunately, there is not a lot there because there were only a small number of low hills on the battlefield, none rising higher than 40' above ground level.

Thursday, 29 January 2009

Polemos:GNW - Second Impressions

Following our first game of Polemos (see post dated 25 January 2009), I asked a couple of questions about the rules on the Polemos Yahoo Group. These were answered very quickly by Nick Dorrell, the rules' author, so full marks for support of the rules and a big thank you to Nick. I have now re-read the rules and they make much more sense with a game under my belt; it is much easier to see how the rules fit together and how the various parts interact. So, with all this behind us, Steve and I set to and played another game. This time we played an attack/defence game. Steve took the Saxons again, defending the small town of Nieder Kurzhosen, which is rumoured to be situated near Cleethorpes. I took the Swedes in a bid to drive the Saxons from the field.

The Scenario
The Saxon garrison of Nieder Kurzhosen has sallied forth from the town in an attempt to drive off the Swedish advance guard. They are afraid that the Swedes will be able to cut communications to the Saxon main army if left unchallenged, so sitting out a siege in the town with its poorly maintained defences is not an option. The Swedes wish to drive the Saxons from the field and sack the town because they are badly in need of the local schnapps, which drink is famous throughout the country.
The Game
In a bid to speed up the game, and taking our cue from the rules, the Saxons set up in their half of the board, while the Swedes were allowed to set up within 1' of their base edge. This meant that the two armies would start about 5 Base Widths (BW) apart. The Base Width is the basic unit of measurement in Polemos: GNW. My Baccus 6mm GNW figures are based on 60mm x 30mm bases so 1BW is 60mm. The table was 4' x 3'. The figures were deployed as shown in the picture below: The progress of the game was simple. We had two hours in which to play the game and managed seven turns. The Saxon infantry occupied earthworks in front of the town and stayed there for most of the game. Only one infantry battalion ventured forth to fire on the Swedish cavalry and that was both late in the game and ineffective. The Swedish infantry were assailed by the Saxon cavalry over on the Swedish left flank in a ding dong battle that saw first one Saxon cavalry unit routing and then a breakthrough by the Saxon second line that routed a Swedish infantry unit. Overall this fighting was inconclusive and honours were about even. On the Swedish right flank all of the Swedish cavalry assailed the Saxon dragoons and drove them from the field in the end. Typically, I had managed to give my worst commander command of my best cavalry, so their progress towards the fight was slower than might have been desirable. The following pictures were each taken at the end of a turn and hopefully should give you a taste of the flow of the battle (More pictures from this game may be found in my Photobucket account).

Conclusions
This game flowed much better than the last one. We achieved roughly the same result in half the time. Issues that were not covered in the rules still cropped up but we were able to work out our own solutions to them until I could ask about them on the Polemos yahoo group. All of my questions so far have been answered very quickly and I would commend Nick on his customer service in that regard. We still think that the game needs a better QRS, but other than that, it plays well and is worth checking out if you enjoy this fascinating period of history when Sweden was a great power.
The game itself felt about right for the period, although I would quite like to see the infantry getting stuck in more. Cavalry seem to dominate because of their extra movement. Command and control is key to winning the game and it is very easy for your commands to become disrupted. It then takes a while to reform them, or, if you have more pressing things to do with your tempo points, your errant troops will just sit there until charged or night falls. This emphasis on command and control really makes the game for us.

So, what does this mean for the game. Well, we enjoyed the game more now that we had clarified a couple of issues. The learning curve is steep but has been worth the climb for us. The down side is that our usual gaming slot is about 2-3 hours so even a small battle of Polemos is unlikely to be completed during one of our usual gaming sessions. We shall certainly play Polemos again because the look and feel of the game work for us but we shall need to allow more time, especially if we try a larger game.

Afterword
Both armies used in this game are Baccus 6mm starter armies. Baccus are linked from the sidebar if you want to investigate further. They also produce and sell the Polemos rules, which were used in this game.

If you are interested in the Great Northern War, I would recommend reading Voltaire's Life of Charles XII (the Everyman edition is good and usually fairly cheap secondhand) and Robert Frost's Northern Wars. The former should give you a good feel for the war from the Swedish perspective, while the latter is a drier but more informative history book. If you opt to buy either of these books, please use the links above because clicking through the Amazon link at the top of the page will help support my thrifty gaming project. Thank you.

Other sites you may find useful are:
Dan Schorr's Northern Wars site. This site keeps running out of bandwidth so get in early in the month. It has many useful pdf files about the period and is probably the most useful site for the period that you will find online.
Nick Dorrell's Great Northern War site has other information and links to other sites too. This is also an excellent site that neatly complements Dan's site.

Sunday, 25 January 2009

Polemos: Great Northern War Review

We played Polemos:GNW for the first time yesterday. I have had the rules for a long time but have never yet managed to play them. One of the things that has put me off is difficulty in reading and understanding the rules. Normally I am very good at learning rules from the rules and do not need someone to demonstrate them first. However, I have really struggled with Polemos:GNW. There seems to be a lot of assumed knowledge on the part of the rules' author, which makes understanding the rules difficult. For this reason I have not previously got around to playing them. So, we steeled ourselves, girded our loins and set to.

The Rules

The rules themselves are fairly standard in many respects, with attack and defence values for each unit and opposed die rolls to see if you succeed. You then consult a table to see what result your attacks have had. The effects of combat see your units gaining levels of "shaken", possibly recoiling back from their enemy, or even being driven back. Casualties per se are not removed. Instead, when a unit reaches three or more levels of "shaken" it will rout. Under some circumstances it can be rallied, but otherwise it is removed from the game. This is how units are destroyed.

The really new idea that they present is in tempo bidding. Tempo is initiative. Each side gets a fixed number of tempo points each turn and add the score of a six-sided die roll to that. Then both players decide how many points they can afford to bid to win the initiative and still do what they need to do in that turn. The bids are compared and the higher bidder wins the initiative. Both players deduct their bids from their total tempo points and that is how many points you have left to do things. These points are used a bit like PIPs in the DBx series of games, but the person that lost the initiative has to spend more points to act with their units, which means that they could wind up unable to do as much as the player with the initiative can. One problem with the tempo bidding was allocating points to commands. This can take a little time as you try to work out what you need to do where.

The Game

So, how did they play? We set up a small battle on a 4'x3' table with two Baccus starter armies. I took the Swedes and Steve took the Saxons. The figures were set up 2' apart for an encounter battle as recommended in the rules.

The first thing we found was that we had plenty of tempo points each as we manoeuvred towards each other. During this phase of the game I made the mistake of positioning my field gun in the wrong place, so I was unable to bombard the Saxons while they bombarded my right wing (to little effect). Once we had closed to contact, however, tempo points and winning the initiative became more critical and we quickly found that we did not have enough points to do everything that we wanted to do. This was especially the case on my left wing, where some squadrons of my cavalry burst through the enemy lines and pursued the routing Saxon cavalry almost to the edge of the board before regaining control and halting. They spent the rest of the game waiting there because they were too far from their commander for me to be able to afford to spend points on them. Elsewhere on the battlefield the infantry had finally closed and were firing at each other, while the cavalry on the right wing were manoeuvring around the wood on the hill, trying to get at each other in an inconclusive cavalry melee that saw both of us with troops routing.

Our game took four hours, before Steve had to leave, and the game had not reached a conclusion, although it seemed to be favouring me, because Steve's right wing had all routed from the table. This left my left wing able to regroup and then they could have fallen on the enemy flank. However, this would have taken time that my centre and right wing might not have had. At this point we decided to call it a draw.

Conclusions

The game was fun to play despite our difficulties with actually reading the rules. More than any other rule set I have played these rules required game play to show how they worked. I would say that they are not for beginners purely because of the way they are written.

The tempo bidding was good fun and a great way of determining who would be able to act first and how much they would be able to do. Both Steve and I like this type of mechanism where you are trying to second-guess your opponent all the time.

Combat was simple enough with the opposed rolls, although the long list of modifiers might put some off. There were a number of situations that cropped up in our game, which did not appear to be covered in the rules but we were able to come up with solutions easily enough and I have now asked about them on the Polemos Yahoo Group, so I hope to have answers soon.

One thing that the rules really need is a coherent quick reference sheet. The QRS that comes with the rules seems to have bits put in wherever they fit rather than putting all the firing tables together, the close combat tables together, etc. This did cause us a few delays in game play as we tried to work out where the relevant tables were.

Overall, we enjoyed the game a lot and will be trying the rules again. We hope to significantly reduce the amount of time that the game took to play as we become more familiar with the game and its mechanisms. Producing a better QRS could help with this. We shall see how it works out.

If you have the time and patience to work through the rules then the game play is ultimately rewarding and I would recommend these rules to you. If you need everything served up in bite-sized chunks then these rules are not for you, unless you can find someone to teach you.

Friday, 23 January 2009

Late January Update

We are now most of the way through January and I shall certainly not complete my secondary objective this month. On the other hand, I have now completed painting all of the goblins and am most of the way through basing them. Pictures will follow when the bases are finished. I am looking forward to getting these figures onto the table now, although this time last week I was wondering if I would ever finish painting them.

One problem I have had with achieving my objectives this month has been our games of Koenig Krieg. We have played a couple of games this month and enjoyed them very much. The pre-game manoeuvring section of the rules is particularly fun, because you manoeuvre your brigades on 'blinds'. Each 'blind' is a large cardboard counter that represents a brigade. Depending upon the initiative level of your general, you may get a number of dummy blinds too. In short, you set up your 'blinds' so that only you know where your troops are and try to scout out the enemy forces and manoeuvre your own troops into a strong position for the attack. This makes each game different and very interesting.

Anyway, playing Koenig Krieg has led to me being distracted by my Great Northern War armies, so I have been fiddling with them, rebasing some of the figures and generally preparing them for more games, instead of painting Goblins and Normans. I have also realised that the armies at Helsingborg are too large to work comfortably with the Koenig Krieg rules. Therefore we plan to try Polemos:GNW this weekend and see if that suits us better. Failing that, I shall fall back on Volley and Bayonet, which are simple, fast rules and fun to play. They don't really have as much period flavour as I would like, but they do make for a great game that can be finished in a reasonable time. We shall still play Koenig Krieg because the rules are good fun, but our games will be smaller than the one I had envisaged.

Below is my Swedish army for Helsingborg in 1710. As you can see, the bases need finishing. The same is true of my Danish army for the battle, which is all painted but still needs the bases finishing. I propose to work on these armies as a secondary objective in February.
Swedes at Helsingborg (Click the picture for a larger version)

All this focus on older projects and actually playing games using them, seems to me to embody the essence of thrift. I have had the Great Northern War armies painted for nearly 10 years now and have played maybe four or five games with them at most. This is due to a lack of opponents that were interested in the subject matter. With the emphasis now on using what I have and making the most of existing resources, this is the perfect time to work on completing a project that has lain dormant for ages. With the bases on the figures done, the next step will be completing the terrain, which is also half-finished and in storage at the moment. I hope it has not gone mouldy!