Monday, 5 December 2022

The Thrappled Lemmings land in Utavoll (Five Leagues from the Borderlands)

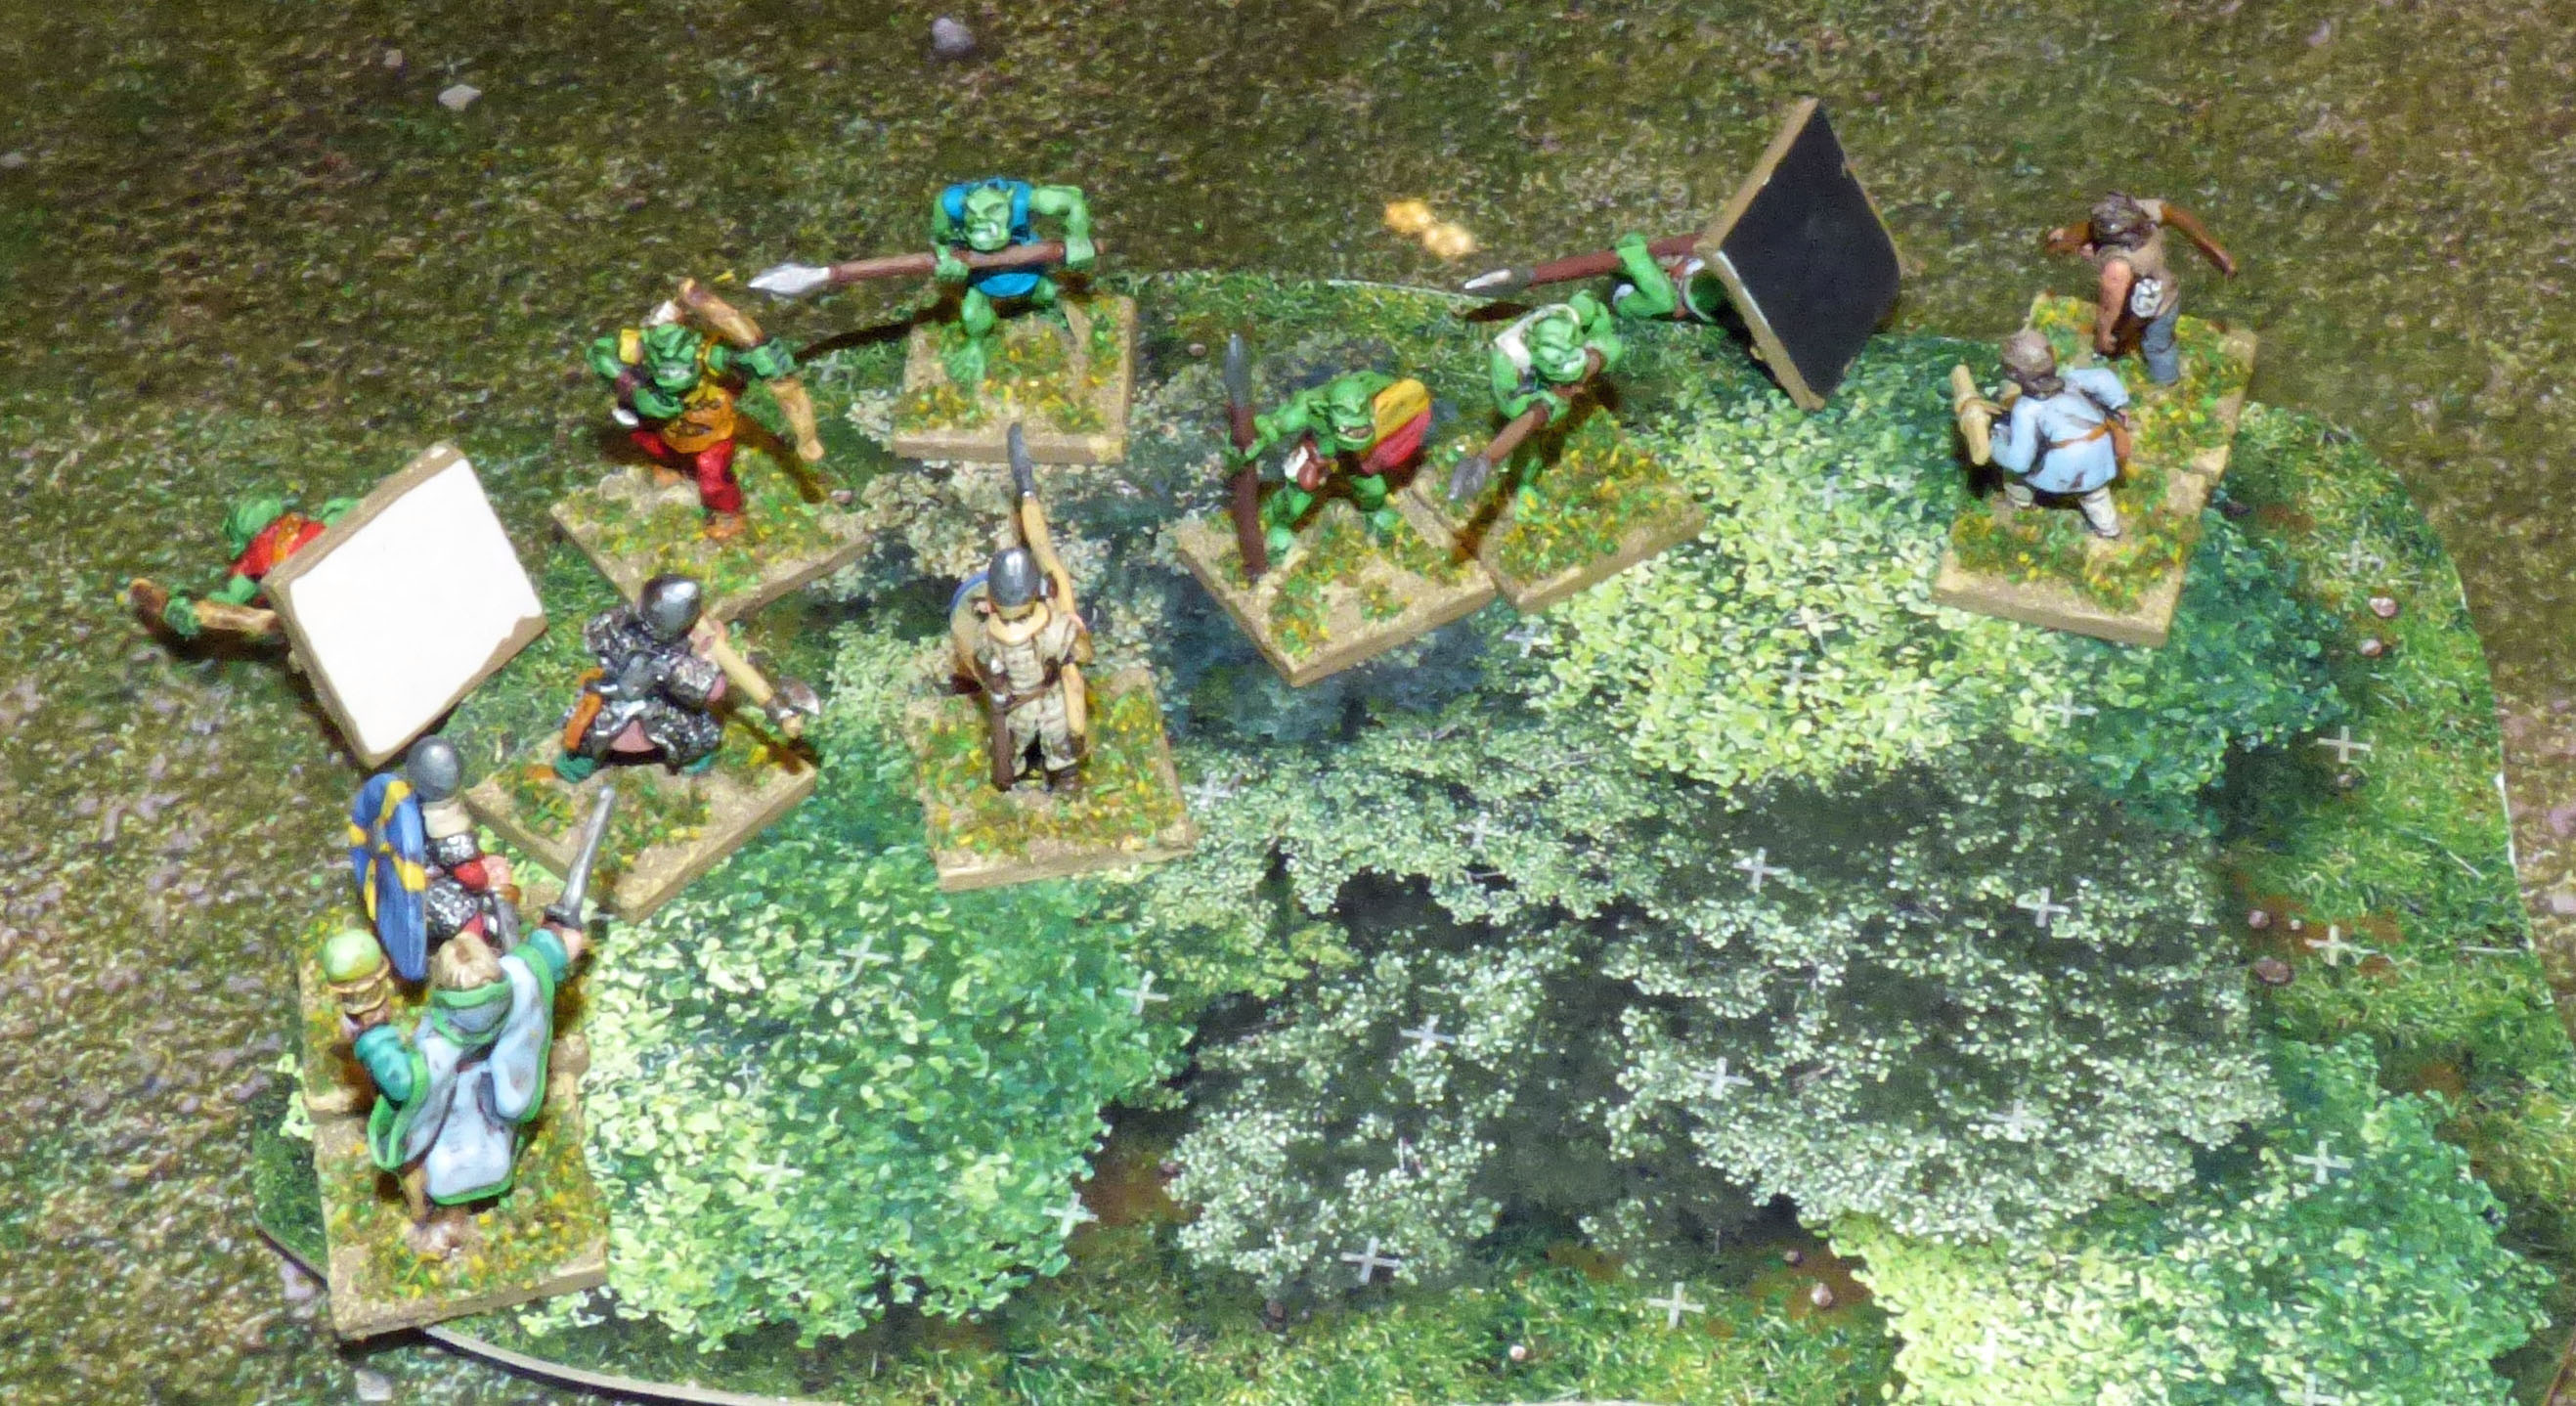
This is the same scenario with the same terrain as in my previous report. However, this time there are more orcs and I am using my campaign warband, whom you can find described in this post on the Thrappled Lemmings. It is still a training scenario, so the warband cannot gain experience or wealth from it but it gives me a chance to try them out.

 The Thrappled Lemmings had arrived in Utavoll. Not where they had intended, but somewhere on the coast. As they marched towards where Fulrad the Guide swore the nearest settlement should be, they encountered an orc patrol. The orcs were a group of seven that were clearly up to no good. You could tell by the way they were lurking in the woods. So, the Thrappled Lemmings chose to do the same and ducked into the cover of the nearest woods. The orcs advanced towards them.

 One of their archers shot at Sir Thiebault, who had carelessly let himself get ahead of the rest of his warband. Fortunately, his expensive armour caused the arrow to ping off. An orc charged Fulrad who pushed it back.Wido and Fulrad pushed the next orc back as it charged the pair of them. The remaining orcs charged forward to form a ragged line of spears facing the adventurers. Fulrad took the opportunity to put an arrow through the offending orc's ears, cleaning out all its earwax in the process. The orc that had attacked him fell dead. Onesipe shot at another orc but missed. Sir Thiebault let out a might roar and charged one of the orc archers, who pushed him back, leaving him wounded and stunned. Drogo charged the same orc archer and cleaved it in two with his axe.

"That's how you do it, Sir Thiebault!" he sneered.

Wido charged one of the spear orcs. His own spear took it through the arm, leaving it stunned and wounded. Unfortunately, he was unable to take advantage of this as the other orcs sought to protect their spearmate.

Lysanthir moved to Sir Thiebault.

"Poor baby, poor baby, poor baby," he began to chant.

As he chanted, the air around him shimmered and Sir Thiebault's wound closed.

Seeing his companions cut down, the largest of the orcs fled the battlefield.

 Onesipe and Fulrad let loose another volley of arrows. Onesipe hit a spearorc, leaving it stunned and wounded. Fulrad bravely skewered a tree. Sir Thiebault charged one of the orc archers, using his willpower to overcome his natural desire to let others begin the carnage. The orc was cut down, its head rolling in one direction and its body in another. Not to be outdone, Drogo charged into the fray, and promptly retreated as the orc turned the tables and knocked him silly with a violent blow. Fortunately, Drogo's armour protected him from worse harm than seeing stars. Lysanthir, like Sir Thiebault, had a healthy regard for letting others lead from the front, but he overcame this with pure will power to charge into the fray himself. Then he retreated quickly as neither he nor the orc could gain the advantage in the melee. Instead of following up Lysanthir, the orc turned on Wido, who skewered it after a quick exchange of blows that saw each gaining the advantage in turn. The orc that Onesipe had wounded decided that now was the time to get its revenge. A quick flurry of blows led to Onesipe pulling back wounded. The final orc attacked Drogo with renewed fury. He was unable to withstand its blows and was pushed back by the orc, bleeding from a nasty wound. Wido saw his chance and pushed in to wound the orc in its side, but was driven back in turn by the orc's battle fury. Despite the loss of their comrades, the remaining two orcs chose to fight on.

Seeing his chance while the orc was focused on Wido and Drogo, Sir Thiebault charged and bravely cut the spearorc down from behind. Lysanthir liked this idea, but the orc pushed him back immediately. The orc decided that Fulrad was a softer target, so it attacked him and got a knife in its belly for its pains. It expired messily.

The orc force was vanquished.

"Hah," exclaimed Sir Thiebault, "My saga gains another heroic episode. I thank you, my sidekicks, for bearing witness to my great actions."

"Yes, yes," muttered Lysanthir, "and more importantly, maybe we can now get on with finding this Evil Temple and looting it, if you are quite done wading in orc guts."

Well, they won. It was less one-sided than the previous game as the orcs scored some wounds on my team. However, as noted at the start, this is still a training scenario and the only thing that can be gained is a Story Point. Story Points are used to help the narrative, be it by allowing me to shape the story being told (e.g. encountering a specific enemy in battle) or by providing a bit of luck when a favourite character is hit or ensorcelled through permitting a reroll of the dice. That means the warband will start the campaign with 4 Story Points. Now all they need to do is roll successfully to find their jumping off point for the whole campaign and get there in one piece.

And, of course, now I need to read the campaign rules in detail. Once I have done that, I shall be back to see what misadventures the Thrappled Lemmings get into. I don't suppose this campaign will be played at a rapid rate of knots, but an intermittent campaign is better than none. That reminds me that i need to get back to poor Broneslav. He has been waiting months for me to create the map of the area he is about to enter.

The Thrappled Lemmings Limp On (Five Leagues from the Borderlands

  The Thrappled Lemmings have been a staple of my gaming since I GMed a Palladium FRP campaign back in the mists of the Stone Age. It was a campaign typical of a bunch of slackers looking for some structured socialising and storytelling: long on fun, short on common sense. Since then, I have used the name for a bunch of warbands. My Rangers of Shadow Deep warband has that name. Now the group gets a new incarnation for my Five Leages from the Borderlands campaign. The key thing is that each of these groups embodies the values and spirit of all that have proudly borne this name before.

This post sets out the team at the start. They will get their own page on this blog where their progress will be tracked

Region: Utavoll

Location: Somewhere near Utstein Marknad

Gold Marks: 3

Story Points: 3

Lysanthir Dawncloud (Avatar)

Origin: Fey Mystic (Level 1)

XP: 1

  • Ag: 1
  • Spd: 4/3
  • Cbt: +0
  • Tough: 3
  • Will: 1
  • Cast: +1

Proficiencies: Foresight, Aura of Winter, Cursed

Spells: Barrier, Fog, Heal, Mobility, Shield

Skills: +1 [WITS], Wits, Scholar

Equipment: Congealed Strands (2), Bastard sword (+0/+1), Staff (-1/0, Parry), Ring of Protection (Light armour 1)

Lysanthir is the leader of the The Trappled Lemmings. He is an Elven wizard and a great one for ideas. Unfortunately, he is not so much of a doer, and it is up to the rest of the Thrappled Lemmings to finish what he starts. The shenanigans started this time because he found an old map in the archives while researching a spell for perfect poached eggs every time. The map points to a dungeon full of treasure in the newly discovered land of Utavoll. All they have to do is get there and find it.

Sir Thiebault de Faicterau

Origin: Human Noble (Level 1)

XP: 0

  • Ag: 1
  • Spd: 6/3
  • Cbt: +0
  • Tough: 3
  • Luck: 2
  • Will: 2

Proficiencies: Driven

Skills: +1 [SPEECH], Leadership, Wilderness

Equipment: Bastard sword (+0/+1), Chain armour (Partial armour 2), Shield (+1 vs Ranged, Parry), Helm

The third son of a third son, Sir Thiebault has been living on his wits since he was born. He hopes that his involvement with the Thrappled Lemmings means that he can live off Lysanthir's wits. Thiebault is the doer of the group. He makes Lysanthir's ideas happen, although he does admit in his quiet moments that he is unsure about this new plan or the veracity of Lysanthir's map.

Drogo Durjardins

Origin: Human Frontiersman (Level 1)

XP: 1

  • Ag: 1
  • Spd: 6/3
  • Cbt: +0
  • Tough: 3

Proficiencies: Driven

Skills: +1 [SPEECH], Speech, Expertise

Equipment: Two-handed axe (+0/+1), Chain armour (Partial armour 2)

Drogo was born on the margins of Thiebault's estate, son of a poor woodcutter's daughter. One day, Thiebault and Lysanthir rode through town and Drogo grabbed his axe and joined the Thrappled Lemmings. He has regretted it ever since.

Onésipe De Quincey

Origin: Human Townsman (Level 1)

XP: 2

  • Ag: 1
  • Spd: 4/3
  • Cbt: +0
  • Tough: 4

Proficiencies: Driven

Skills: +1 [SPEECH]

Equipment: Crossbow (24", +1/+0, Bulky, Limited ammunition), Light weapon (-1/+0) Light armour (1)

Onésipe was always looking for the main chance, and then Thiebault rode through town looking like a million gold pieces (It had been a lucky week, and few were like that ever again). Onésipe joined up immediately and is now heartily sick of the gruel they regularly eat.

Fulrad

Origin: Human Hired Guide (Follower)

XP: 0

  • Ag: 1
  • Spd: 4/3
  • Cbt: +0
  • Tough: 3

Proficiencies: Driven

Skills: +1 [SPEECH]

Equipment: Self bow (18", +0/+0, Bulky, Limited ammunition), Standard weapon (+0/+0)

Fulrad needed a job and the Thrappled Lemmings hired him. As long as they continue to pay him, he will stay with them.

Wido

Origin: Human Wily Rogue (Follower)


XP
: 0

  • Ag: 1
  • Spd: 4/3
  • Cbt: +0
  • Tough: 3

Proficiencies: Driven

Skills: +1 [SPEECH]

Equipment: Spear (+0/+0), Light armour (1)

Wido needed to leave his job with the city guard in a hurry. 'Luckily' the Thrappled Lemmings were recruiting.

Equipment Stash

1 Light Weapon

Backpack

Silvertree leaf (2)

Sunday, 4 December 2022

Training Wheels (Five Leagues from the Borderlands)

 I've painted enough figures and I've read the rules. Time to take Five Leagues from the Borderlands for a ride. This is the starter scenario in the rules. Four orcs attempt to drive off four humans. I'm going to be the humans this time around. It makes no difference as the two forces are completely interchangeable for purposes of this scenario.

The Protagonists (left to right: Blixt, Perrin, Stafford, Sunderin)

The orcs are Demonworld 15mm from Ral Partha. The humans are Norman soldiers from the Two Dragons range sold by Caliver Books. The board is a printout from WargameVault which I have put in a cheap frame from Clas Ohlson. The rest of the 2D terrain also came from WargameVault (Just Paper Battles and Tiny Worlds) and I still need to edge it, but I want to play now(!). I'm making up a bunch of 2D terrain for ease of storage while I am separated from my regular terrain, although looking at the woods on the table, I really want some trees to put on those templates. I may have to head down to the model railway shop at my next opportunity.

The Hostiles (left to right: Grokk, Gryn, Grig, Grubb)

The Game

The battlefield

The orcs are lurking in ambush in the woodline, but Blixt the Scout has spotted where they are likely to be. He runs to the nearest copse and takes up position on the edge to cover his own side's advance. An arrow thunks into the tree near him as Grokk the Archer fires.Grub, Grig and Gryn advance quickly towards Blixt, attempting to get into the cover of the same copse. Perrin the Spearman races to support Blixt, as does Stafford the Swordsman. Sundelin the Bludgeon races for a different copse, intending to outflank Grokk before he can do any more damage.

The forces close with each other while the archers shoot

Blixt shoots at Gryn and hits him. The arrow pierces his armour, but Gryn is tough. although wounded and discombobulated by this, he remains on his feet. Perrin moves in to attack Grub. Grub is caught out by the speed with which Perrin moves and is run through by Perrin's spear before he can do anything. Stafford seeks to emulate or outdo Perrin's feat and moves in to attack Grig. Stafford narrowly beats past Grig's defences, showing nothing of the skill that Perrin displayed and the blow is stopped by Grig's armour. Grig is driven backwards and Perrin follows up. Perrin's next blow only just gets past Grig's defences, but it is enough. Though inelegant, Grig is laid low by it just the same. Grokk is distraught at Grig's death and fires at Stafford but misses. Gryn, despite being wounded advances on Stafford too. Unfortunately for Gryn, Stafford quickly turns the tables but Gryn regains the initiative only for Stafford to regain it. The two step back to grab a breather. Meanwhile, Sunderin races towards Grokk but cannot quite reach him.

First and second blood to the humans

Blixt fires quickly at Gryn but misses. Stafford closes on Gryn and disposes of him in a trice. Snicker snack, the orc leader falls in two parts to the ground. Grokk attempts to shoot Sunderin but misses. His hands are trembling too much to aim properly. Sunderin charges into melee but Grokk's desperate defence holds him off and the two stand a short distance apart looking at each other.. Perrin races across towards Grokk but does not reach him yet.

Third blood to the humans too!

Sunderin closes once more with Grokk who defends desperately, but in the end is wounded by Sunderin. Perrin races in to join the melee. Grokk is still stunned from his exchange with Sunderin and is easy meat for Perrin, who immediately skewers him. The soldiers have completed their patrol successfully.

The humans hold the field

Conclusions

Well, that went well for the humans. I am fairly sure I got most of the rules right, so that is a bonus, but I had better read them again just to be sure.

The main issue I had was caused by forgetting that a Stunned result is removed at the end of the phase in which it happened so I spent ages looking for what to do when a hostile was stunned and it was their turn. The answer was that he was not stunned, because he got stunned in the previous phase of the turn. That's what happens when you overthink things and bring baggage from other games to the table.

There were also issues with remembering to account for the status of figures, but that will come with practice. It may also help to make some stunned and wounded markers for the game.

The game itself took about 30-45 minutes to play. This included a lot of looking up of rules to check I was playing it right. That is pretty good for my purposes. I could get several campaign turns played in an evening if I so chose, or I can just have a quickie (as it were!) and play a single game when the opportunity presents. Works for me.

Now I just need to read the rules again and roll up a warband of my own. Then I shall play this scenario over again to let the rules embed properly before cracking on with a campaign.

Wednesday, 30 November 2022

Welcome to Utavoll (Five Leagues from the Borderlands)

 I picked up Five Leagues from the Borderlands earlier this year and am looking forward to trying it. I am busily painting 15mm baddies for the game. It will be a wee while before I am ready to play, but I got excited and started on the map which is at a stage where it is now fit to be shared, if not fully done.

Welcome to Utavoll

Utavoll is terra incognita. It is a land to the east of the known world where people are settling. The coastal regions are are relatively well settled now, but dark things are stirring and brave murder hobos are needed to tame this new land for elf and dwarf and human alike. Enter our heroes. Their names are unknown at the moment. All we know is that they are sailing from Nurthvaygr even as I type. We know that they will seek to make land at one of the coastal settlements, so let us look at the area they will arrive in.

The coastal settlements of Utstein and Elsfjord are natural landing spots. The swamps to the west of Haitabu are not a great place to land and anywhere else on the coast is too unpopulated to be useful. Haitabu is a seasonally occupied nomadic camp. It has a small permanent population but local nomads congregate there in larger numbers at regular intervals. Fikaby is a small farming community of the most anti-social settlers, pushing into the wilderness to break new ground and avoid what passes for the authorities in Utavoll.

Utavoll (1 hex = 50 miles)

Orkheim in the north-east is a known camp or staging area for the hostile orc forces in this area. The orcs are a major threat to the people settling the area, although some have suggested that the reverse is really the case.

The Hooded Men are a gang of outlaws whose goal is to enrich themselves at the cost of the peaceful settlers and who need a better name but my imagination is lacking right now. Their numbers are unknown but we know that they have a camp in the Myrkved Woods.

The Synod of Reason in the south-east is a cult of necromancers who seek immortality as liches. Their rituals raise the dead and send them against the living. By consuming the life force of the living, these foul sorcerers bolster their own life force. When they have enough, they can perform an unspeakable ritual to convert their living bodies to undead ones with all their powers intact.

White Peak Delve is a known dungeon in the central mountains and there is a known area of interest in the far north-east that has not yet been explored.

This, then, is the map at the start of the campaign. I created the map in Campaign Cartographer 3+ using the Mike Schley hex style. I like how it looks and can easily update it as new areas of interest appear. It still needs some fettling for me to be fully happy with it, but it is perfectly usable as is. There is plenty of unexplored wilderness and I have a field to the left of the map where I can type up hex locations and their contents as they are added to the game.

We'll see how it goes, but I have a certain desire to play this as a hex crawl as my warband explores the area and maps it. Not sure how that will work out, but it could be fun to try.

I already know which baddies I shall be using, based on what I already have available to me, so it is just a case of cracking on with the painting. I'm going to be playing in 15mm and the figures are a mix of historical Vikings and Normans from Two Dragons Productions (now sold by Caliver Books) and Demonworld from Ral Partha. I have plans to add figures from Alternative Armies because they have a decent range of the monsters that will occasionally turn up.

So, that's the game set-up. I had better get back to the painting table so that I can play sooner rather than later.

Tuesday, 15 November 2022

'Warfighter: The Tactical Special Forces Card Game' from Dan Verssen Games: Some further thoughts

 I've played a couple of dozen games of Warfighter now, both on VASSAL and physically. So, it's time to follow up my previous reports with a few more thoughts. These are based on the content of the VASSAL module which you can buy direct from DVG and on the core module with a few expansions that I bought.


The VASSAL module

The VASSAL module includes the core game and expansions 1-47. That is a lot of content, but not everything released for the game at the time of writing. I am fairly sure that the additional expansions will be released as mods for the VASSAL module, but I have no idea when that will be.

Even though it states expansions 1-47, it does not include 47 expansions, because the Warfighter expansions in that series include the Warfighter: Shadow War and Warfighter PMC core games plus expansions for them. It's still a good lot of content though and offers plenty of options for your games.

One issue I found with the VASSAL module was that one of the Eastern European missions had the wrong card image, so I could not play it on VASSAL, because you need to be able to reference those images. I wrote to DVG about whether that mod would be updated but have not heard back. There might be other issues with the cards in the mods but I have not found those yet.

The VASSAL module is good and lets you get started playing with a wide variety of forces for player squads and adversaries. It is consistent in form, so you do not need to worry about differences in cards (more on this in the physical game below) and it includes the rules as part of the VASSAL module as well as two scenario books that set out missions with specific forces and objectives. I have not tried the scenario books, so cannot commment on them.

Using the VASSAL module is simple, so the game is easy to play with no need to spend time digging out the cards and setting up a playing area. As the whole set-up is consistent, whether or not it conforms to the most recent errata or not, there are no issues with sorting out the cards as I discuss for the physical game. My only issue with it is that I could do with a larger monitor than my current 27" one, so I do not have to scroll or zoom to get to different parts of the game board

When I bought the Modern VASSAL module, I also got the WW2 module. I am glad I started with the VASSAL modules. They gave me a good feel for the game at a decent price and showed me that I preferred the Modern version.

Warfighter 4th Edition

The core Modern game comes with US soldiers and equipment, Middle Eastern insurgent and military adversaries, and Jungle Cartel adversaries, plus the appropriate locations, counters, rules, board, one scenario book. This is all entirely playable out of the box.


The 4th edition also includes all the latest card updates. These have happened along the way as the game has developed and expanded to the point where there is an upgrade pack containing 360 cards for those with earlier versions of the game. If you are only going to play the 4th edition core game, you don't need the upgrade pack.

The upgrade pack also includes cards for the first nine expansions, which were released before the changes to the game. You simply swap out cards with the same name for those cards in the upgrade pack. It is fairly simple to do this, although it gets confusing because the card numbers are often not the same and there are a lot of questions about just this on the BGG forum, so it is not just me getting confused. Some of these expansions have been upgraded to the new cards, but others have not. When I bought my copies, I found I had a mix of the two. This will depend upon stock at the place you buy the game and when they got it in.

I'm glad I got the upgrade pack because of this, but it is also useful because having duplicate or triplicate cards for the equipment makes it easier to remember who is carrying what.

The issue comes when some of the cards ostensibly depicting the same equipment have been upgraded further. My 4th edition core game came with a MOLLE card that lets my troops carry more stuff, but the cost was more than in the other set this card came in, and I was not sure which was correct. Referencing the VASSAL module, I was given one stat set, but when I checked on the BGG forum, I realised the VASSAL version was out of date. Not a problem when it is consistent within the set, but confusing when putting together various expansions.

Another issue I have found was that the core game is meant to come with two of the MOLLE card but I only received one. I need to contact DVG customer service about this. In the meantime, I have printed out the version of the MOLLE that I am using and have pasted it onto the older version of the card so that my set is consistent.

My final issue to mention here is with the Australian set I bought. You get two copies of the AUG F88 rifle, but each of my two copies had different long range stats on them. I found out which was correct on the BGG group very quickly and also learned that the suppressed version, for which you only get one card, also had the wrong stats. It's a bit frustrating that these errors are present when you pay good money for these things, but I have pasted the correct stats onto the card, so it is not a total loss. I'll be copying and pasting the most up-to-date versions of the stats onto any other cards with similar errors. It's not elegant but it does the job. One other thing I have done is to copy and paste the most commonly used weapons (in my case grenades) onto spare weapons cards, so that I have enough to go around. This is a good way to use the cards that have been removed from the set for being outdated.

The Verdict

It really is a fun game and a lot more interesting than I initially thought when I first read about it. Each game plays out like scenes from a movie and the sorts of tactics that I feel ought to work in real life do work in the game, as long as the dice do not mess things up for you. Playing a series of games with the same soldiers can result in you getting attached to them, and it gets to feel like a role-playing game at times.

Overall, the physical game wins out despite the slight irritations. I spend all day at work using a computer screen and don't particularly want to stare at one in my downtime too. Shuffling and moving the physical components is also a large part of my preferred gaming experience, and is far superior to clicking and dragging. That said, getting the computer to do the shuffling for you certainly does save on picking up the cards from the floor when I drop them. That happens all too often these days!

The actual physical components feel sturdy and good quality. The downside of the physical game is the footprint on the table. You'll likely use a large part of the typical dining table to get set up, although people do suggest ways of reducing the game's footprints, such as card holders that keep your cards upright.

There are a lot of expansions for the game. You get a large number of them in the VASSAL module and it would cost a fair bit of money to match that in the physical version. That said, you don't need all of them to play. There is a good game to be played right out of the box. I don't see me buying every expansion, simply because not all are of interest, but I could certainly be tempted by a few more, and adversaries packs that control the opposing force are more likely to tempt me than more nations ... well, unless they add the Norwegian army ...

With all this in mind, I very much hope that they get around to the Near Future/Cyberpunk version soon. I would love to use this system to build and run a cyberpunk gang, hacking my way past security and running extremely hostile corporate takeovers.

Thursday, 10 November 2022

A Walk in the Light Green 10: Take 'Em Out (Warfighter campaign)

 This Warfighter campaign uses the Warfighter Modern Australian pack as the player side and African Warlords packs 1 and 2 for the adversaries and missions. This is the tenth and final game in the campaign. Click here to read the previous game.

So, I started trying to write this in the style of Jerry Ahern's Survivalist novels because I thought it would be fun and it felt nostalgic as I had read a few of them in the eighties. I gave up. This post would have been ten times the length it currently is. Enjoy the first part, just the same, and please forgive me for not describing the weapons, bullet weights and muzzle velocities in more detail! I promise to attempt more brand-aware game reports another time.

"Gray, we got them on the ropes. Here's the target package for the last of the poachers in this area. Time to take 'em out. You've done a great job so far and I'm giving you all the resources available. Pull this off and you can get some R&R. Take Ross with you and show him the ropes. He'll be taking over from you while you're opening tinnies on the beach back home."

Gray looked through the package briefly, saluted and left. Time to gather his team and brief them. Ross was a fire-eater with a good track record in other theatres but relatively new in Bwendi. Chances were he would be a good replacement for Gray though. The rest of the team knew Gray from previous missions and they had worked together well throughout the current campaign. Gray laid out the mission for them.

It was going to be a long trek in the heat, so they would not be able to pack much in, but they could expect a parachute drop of supplies half way to the poacher's camp. That should help them restock and make the final push. It also meant they did not need to conserve ammo in the first half of the mission. With the team briefed, they moved out.

Cradling the weight of his SIG MCX lightly in his arms, Gray ordered Reid to take point. The experienced soldier had good eyes and was packing enough grenades to start a fireworks show.

"Hippos," muttered Reid, "Why did it have to be hippos?"

The river ahead was devoid of cover, and surrounded by open fields. A civilian caravan was passing nearby. Not a lot the team could do other than hope they did not alert the poachers further down the route. Worse yet, hippos were enjoying the cool water of the river. Reid directed the team around the hippos to a safer crossing point. Safer merely meant that the team had the drop on the poachers lounging near it. A group of guards were chilling with their feet in the water. A nervous kid looking uncomfortable with the 4kg weight of his AK was near them. More worrying were the gunman and his crew who looked experienced and watchful.

Reid pressed forward on his belly through what little cover there was. As soon as he was close enough, he threw an F1 grenade at the gunman. 30g of RDX detonated, sending metal shards flying at lethal speeds through the gunman and one of his crew. The other fled as fast as he could.

Evans, following Reid in, lobbed another F1 at the gunmen chilling by the water. One of them disappeared into the water in a spray of blood and flesh. He would be food for the hippos soon enough. The other froze just long enough for several 5.56x45mm NATO rounds to rip through him as the whole team opened up.

The kid rabbited, dropping his AK behind him in his haste to get away.

The team secured the area quickly and began to cross the river. As they did so, two more poachers emerged from the brush. Ross detonated the Claymore he had deployed as soon as he was over the river. Around 700 steel ball bearings shredded the brush and two of the poachers at around 1200 metres per second. The hippos were going to have to drink these guys. The other was wounded and ducked into cover. Gray gave the order to smoke him out.

A blast of 5.56mm rounds soon put paid to the guy, but a jumpy looking guy leapt out of ambush at the same time, only to fall to another hail of hot lead, just as Gray had got the team ready to move out. Ahead lay some of the traditional Bwendi domed huts. The team moved in and suddenly found that the area was hot. Gray cursed.

"Damned caravan must have warned them."

Then there was a sudden explosion. A local meeting erupted into chaos as someone had clearly goofed in priming their bombs. People ran in every direction as the team moved in. Unfortunately, the poachers stationed here looked looked like a main force with leadership and they were dug in. Gray called in the drone. The officer and his crew disappeared in a pink mist as the bombs scored a direct hit. The chopper's minigun put paid to another squad of hostiles as hundreds of rounds of 7.62mm bullets tore through them in a classic case of peace through superior firepower.

Under cover of the noise of the explosions and the dust from them, the team moved in, throwing grenades and firing long bursts until the only noise left in this village was a the ringing in their ears.

"Right, let's move on before those locals warn anyone else," Gray commanded and got his team ready to move on.

Unfortunately, the grassy fields beyond the huts were heaving with heavily armed poachers. Reid took point again, throwing a grenade at a group of riflemen idling on the edge of the corn, causing them to get their heads down. He followed up with a grenade at a group of inexperienced riflemen who were bunched closely enough together to make them too tempting a target. Evans followed closely behind him and dropped a grenade on a machinegun team that slowed them down enough for Gray to move in, fire a burst of 5.56mm that shut them down for good, and then called in the drone once more to drop a heavy load of high explosive on a more experienced looking group of riflemen. Pearce, Rogers and Ross followed closely behind as Gray took out a hostile with an RPG who had just popped up, and their combined fire cleared the way across the field.

The men were sweating and their mouths dry, but they needed to keep moving to hit their target. Time was running out but they were functioning well as a team despite the heat, and they were nearly at the supply drop. Good job too, because they had used up all their F1 grenades and were going to need a case or two of 5.56mm ammo to keep them going.

The rocky lake that was the RV for the supply drop lay ahead of them. The midday sun burned down. Unfortunately, there was little time to stare into the water and contemplate their place in the universe, because the poachers were dug in around the lake. Two machine-gun teams, a sniper and a bunch of riflemen were waiting. Fortunately, the team had remained unseen so far. Gray gave the order.

"Rapid fire! Take the bastards out!"

A hail of copper-jacketed lead streaked towards the hostiles, as the drone dropped high explosive on the machine-gun cart and those with grenades left ensured that the poachers were fed as much RDX as they could stomach. In short order, the drop zone was secured and Gray called it in. The team resupplied, filled their canteens from the lake and prepared to head out on the second leg of their mission.

The hot plains beyond the lake were a massive contrast to the cool waters of the lake. The soldiers cursed the heat and licked dry lips. Their only consolation was that the hostiles were obviously no fans of the heat either. Those few hostiles who were out in the heat were not paying attention and it was a simple matter to rain lead on them until the heat ceased to bother them.

The river ahead looked like a place of refuge, but it was not to be. The hostiles were here in force. Worse yet, it looked like a prepared position. Reid, on point, spotted and IED and led the team around it, but things could have been bad there. Once more the heavy weapons were out. Reid pointed out to the rest of the team an RPG gunner and a dozen riflemen all looking menacing. Ross let rip a burst of high velocity lead and the RPG gunner dropped where he stood. Pearce lobbed an F1 at a group of gunmen, killing one and suppressing the rest. He followed up with a burst that killed another hostile. Rogers dropped a long rifleman with a well aimed burst and several of the other riflemen fled into the bush. The sight of their fellow being felled was too much for them. The remaining poachers were quickly disposed of with a combination of grenades and rifle fire.

Gray and his team paused to regroup and prepared to move on. They crossed the river carefully, dodging around a more professional-looking than usual group of poachers. Suddenly an ambusher ducked up. Ross sent several hundred ball bearings his way as he triggered the Claymore that he had set up as they secured their perimeter. The ambusher disappeared in a spray of blood. As they moved out of their crossing point, more riflemen could be seen. Evans and Reid threw F1s at them and the fragmenting casings shredded several of the poachers. The whole team then opened up with their rifles and filled the air with lead. This proved unhealthy for the remaining poachers. However, the team could see a hostile patrol approaching. Their objective was in sight though. Not long until they got their, although the obvious heavy machinegun emplacement was ominous.


Once across the river, the team had to make their way through a large village. Reid immediately spotted three RPG teams as well as sundry other riflemen. The enemy patrol had reached here too, so it was clearly time to dig out the big guns. Ross radioed battalion and got access to a mortar stonk that vapourised several of the riflemen and made the remaining one keep his head down. Gray brought the drone in and one of the RPG teams disappeared amid the dust and fire of a missile strike. A sniper from battalion dropped another rifleman. With two careful bursts, Gray neutralised two RPG teams and ordered his men into the village. The overwhelming firepower of the Aussie team quickly neutralised the rest of the hostiles, although they were now running low on grenades. Unfortunately, they were now in range of the heavy machinegun. A burst of heavy fire tagged Reid, who was on point. He was still mobile, but was slowed down now.

It was obvious that the team was now approaching the poachers' main camp and that the poachers were desperate. There were no fewer than three machinegun nests, an RPG gunner and one group of dug-in riflemen in the grassy plains before the objective. Ross called for mortar fire again, killing one machinegunner and wounding his assistant. The sniper took out another gunner, and the drone destroyed the machinegun nest on the objective. With most of the hostiles suppressed, the troops moved in and sprayed 5.56mm rounds on the enemy. Soon, none were standing and the team were preparing to move on the objective.

By now, the heat was really telling and the team were flagging. Only Gray and Ross seemed to be fully acclimated. The poacher camp ahead was heaving with hostiles. Gray cursed as he saw the guard hippos too.

"What is it with these damned hippos everywhere?" he muttered as he directed his team around them.

Ross called up the mortar one more time. The poachers' officer and his crew disappeared in a pink mist. The sniper's rifle cracked and a gunman fell. Gray called down another mortar strike and took out half of the machinegun crew. Reid moved into the objective first. His grenade made a bunch of gunmen keep their heads down and he took out two dug-in riflemen at close range with his rifle. They never even saw him coming. Evans closed in next and neutralised two groups of hostiles with his F1 grenades. Ross followed up next and quickly took out the last of the machinegun crew with a single shot to the head. The rest of the squad followed in short order and blasted everything that was moving until it stopped. As the dust cleared, they realised they had taken the poachers' camp.

Gray radioed in and called for extraction. The poachers would not bother this area of Bwendi again, although he doubted that was the end of the problem. Many of them would move quickly enough elsewhere, but that was a problem for the the top brass. He was heading home for a few tinnies by the beach with a satisfying sense of having done his job well.

Reid got wounded again, but Gray got him out of there, so he will just have more scars to impress his beloved with. Luckily, Ross drew the Shake It Off card straight after, so he could heal the wound and return Reid to fighting fitness there and then.

  • + 11 VPs = 64 VPs. That's a solid strategic victory. Gray has won the campaign and driven the poachers out of the mission area.
With the campaign won, time for some reflection. I think I am down with the rules now and made few, if any, mistakes. The most difficult part is keeping track of where I am up to in the turn and making sure I work through it methodically. With the team I had, and recruiting an extra player soldier, this final mission felt unchallenging, although I am certain it would have got challenging if I had stopped thinking hard about where to attack and ensuring that the enemy were suppressed at all times. The fact that Reid got wounded is proof of that. I forgot I had moved into range of the heavy machinegun and Reid paid the price.

I have thoroughly enjoyed these forays into Warfighter. The game requires focus, some decent decision making and a bit of luck, which is really a good combination. Your decisions are meaningful and a moment's carelessness can cost you. The only negative point is the need to sort through the supplements to make sure you have the right versions of the cards. I noticed a couple of cards in the action deck that were wrong, but the numbers suggested they were from the update kit I bought, so I need to go back through all the spare cards and see if I have included in my action deck cards that should have been removed. That's fine though. I'm still convinced that my main hobby is organising my games and their storage rather than playing them.

So, with campaign over, I'm not sure whether to start another campaign or to play something else next. We'll see.

Sunday, 30 October 2022

A Walk in the Light Green 9: Eliminate the threat

This Warfighter campaign uses the Warfighter Modern Australian pack as the player side and African Warlords packs 1 and 2 for the adversaries and missions. This is the ninth game in the campaign. Click here to read the previous game.

Well, this has taken long enough to write up. I played this game over a month ago, but have since had a lot of family stuff to sort out, so it has languished in note form until now. Hopefully, I shall get the next scenario played and written up over the next week or so, now that things are returning back to whatever passes for normal these days.

"Time to take it to the poachers, Gray. I'm chucking all the resources at you for this, so don't fuck it up."

Gray looked over the mission brief. He had drone support, an attack helicopter and the whole squad for this one. It was going to be a hefty hike into the brush, but he reckoned they would be alright as long as they could dodge the damn hippos that were everywhere out here. If the poachers had gone for hippos instead of elephants, he was sure that his team would not have been deployed here in the first place because everyone seemed heartily sick of the damn things.

Still, even with all that support, he could not afford to relax. The team moved out and quickly encountered hostiles in Tempey village near the base. A brief firefight ensued and the hostiles were neutralised. Moving on through a local goat farm to a village by the river and then on to a smaller village and some rural housing on the other side, the team worked slowly and methodically to elimate the poachers as they went. It was a job that required them to stay focused as they moved through the various built-up areas.

The open plains beyond the housing were dangerous, but the air support helped a lot and the team were able to keep moving despite Reid taking a bullet in the leg that slowed him down. Then they navigated their way through a maze of huts that was also the feeding grounds of a bunch of hippos. I mean, what kind of person would make their home where hippos roamed?

Then it was on to the parched and baked plains beyond. The heat took its toll, but Gray kept the team motivated and they were able to move out quickly as a unit to their objective: the poachers' main camp. The team moved in. A combination of drone strikes, air support and grenades soon neutralised the whole camp, and the team were able to return home quickly with the sense of satisfaction that a job well done gives.

This time it was Reid that got wounded, but not too seriously. The team retained initiative throughout the mission, which made it easier to avoid getting shot at, and I rolled well for the heat, so they were not slowed down too much by that. Reid's wound can be attributed to too many soldiers suffering from the heat on one turn, but other than that, it was all good.

There is one more mission in the campaign. I hope that Gray can keep his shit together long enough to finish that final mission and go home for some well-deserved R&R.

  • + 10 VPs = 54 VPs. This is currently a strategic victory. As long as Gray does not die next scenario, I reckon I can count this as won and the poachers driven out of the area.
  • + 10 Mission Points. With 2 left over from last time, Gray has 12 MPs to spend. I buy him Hydrated, which means he can spend XPs to retain Hardy tokens, representing his better management of his fluid intake. I justify it to myself by noting that he is almost at the end of a tour of duty in a hot environment and must have learnt something along the way. I also buy Zeroed, which improves his chances of hitting and killing hostiles. After all, he is now a highly experienced combat veteran.

Mission Adjustments:

  1. -1 Mission Time. I get one turn fewer in which to accomplish my goals again. That means the final mission will be 2 turns shorter.
  2. +2 Locations.
  3. +3 Skill Cost
  4. -2 Loadout