Last night we played Imperial Commander. It was a total nostalgia-fest as I have not played IC in 10 years or more but we played it all through my university days in the mid-eighties. In this game my Bwendi army was busily trying to duff up Steve's Albion Defence Force and doing a rather good job of it too.
The Rules
Imperial Commander is a set of rules for massed skirmishes of around 50 figures per side. IC is the big brother of Laserburn and is also the rules set that grew into the monster known as 40K. In these rules your figures are organised into squads, usually of around 5 troopers. You can have heroes and leaders in the game and there is some room for vehicles too, but it is primarily an infantry-based game. Most of the vehicles that feature in the game will be APCs and possibly the odd jetcopter or two. The action is fast and furious with troopers being killed fairly easily if they get hit. Pity the guys with no armour at all!
The rules are simple to read through and easy to understand. It is a shame that they do not include the points costs for all the weapons described, but they can be worked out. Likewise, the points value of some of the units in the army lists is inaccurate. Another problem is that some rules, such as unit coherency, are hidden away in places that you would not expect them. Still, overall, there are few problems understanding the rules and the mechanisms are simple enough to follow.
IC uses d6s and d10s.
The turn sequence in Imperial Commander is fairly standard:
First player moves
Both players fire
First player moves again
First player conducts close combat
First player tests morale if the casualty threshold is reached.
Second player then follows the same sequence.
Shooting is done by rolling to hit for each figure firing and then rolling for the effect of the hit. The to hit roll is also used to determine if a trooper runs out of ammo / breaks their gun. You can fix guns / reload but that takes an action and you have to roll to succeed.
Hand-to-hand combat is even more deadly than shooting. Each player rolls 1d10, modified by weapons and troop quality. The loser dies. In cases of a tie, the attacker dies. Don't get into hand-to-hand unless you are confident that you will win!
Morale is only ever tested by a force that reaches 50% of its morale strength (shaken status), which is calculated based on the number and type of troops, number of leaders and number of vehicles in the force. Tip: picking off the leaders will reduce your opponent's army to shaken status really quickly!
Our Game
Set-up (my troops on the left, Steve's on the right)
We chose 750 points of troops each and played a straight encounter battle with the aim of driving off the enemy force. We each had a heroic leader in overall command of our force, but neither of our heroic leaders actually did more than wander around in their impervious energy shields. So much for being heroic. I had equipped my troops with jumpacks, so they were bounding forward like so many demented grasshoppers, while the Albion Defence Force trudged forward through the mud. This meant that I was able to occupy the buildings in the centre of table while Steve was still advancing through the woods on his side. Nevertheless, he still scored first blood, while my return fire resulted in a broken weapon that never got fixed for the rest of the game.
With my blood up after losing some of my heroic men-at-arms, I flew my jetcopter into position behind one of his squads and dropped a missile pod on their collective backsides, killing all bar one of them. From this point onwards, Steve's troops started forming circles at the end of each of his moves. Although my jetcopter only actually fired once more at another of his squads, and this from long range, it still managed to kill most of that squad too. What I found was that just having it on the table was enough to make Steve wary and helped me tremendously in directing the flow of the game.
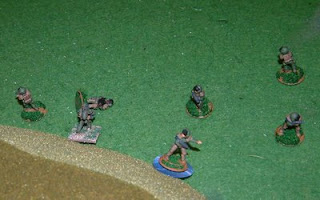 A brave man-at-arms jumps into melee with the enemy's elite bodyguard
With Steve's entire right flank in tatters, and with my soldiers having picked off a lot of Steve's leaders, his morale was looking shaky. That said, my troops on my right flank were also looking rather poorly by now.
My right flank with only three surviving troopers in the building and one chap with a broken gun (he broke it with his first shot of the game and never fixed it before he was shot towards the end of the game)
So, I played a cheesy move and targeted what I thought was a leader in one of his squads. Killing this figure, and the figure's leadership status being confirmed, was enough to push his troops into shaken status. Steve needed to avoid rolling a 7 or more on 2d6 or his army would break. He rolled a 7. His men now had to spend at least one movement action retreating in each of his turns, which meant no advancing any further than the line he currently held. The game was effectively over.
Bwendi Knights deploy straight into close combat from their jetcopter. They have never been defeated!
At this point the Bwendi Knights flew forward in their jetcopter and deployed by aerial assault (jumpack deployment from a hovering jetcopter) to win the battle for my side. Steve's leader had rallied two of his troops, who would therefore continue to fight normally. The Knights piled in and killed these two in no time at all. At this point we called it a day and the Bwendi Knights retired undefeated once more and returned home for tea and medals all round.
Final Thoughts
Although this system was first published in 1981, it still works well. The rules are simple and can be expanded to fill the gaps as needed. With all the dice rolls for shooting, the system ought to be clunky, but our game flowed really well. I like the fact that both sides get to shoot each turn and that all shooting is simultaneous (with the exception of concealed troops breaking cover to fire). The split movement phase works well too. The only thing that seems a little slow is infantry movement. We might have done better to start closer together because the basic infantry foot-slogging movement is only 8cm per move, which is not very much.
It is a shame that it has never been updated for the errata but Richard Halliwell and Brian Ansell went on to do other stuff instead. Still, a
free rules set based on Imperial Commander is available from Neil Cooper, so if you feel like trying these rules out, you could download them instead. You can also buy Imperial Commander from
15mm.co.uk, along with the range of figures that it was designed to accompany. You don't have to use the "official" figures, but they are still very nice sculpts, even nearly thirty years after they were first produced.


