Showing posts with label Battle Report. Show all posts

Tuesday, 2 December 2014

Picts invade Vikingland - a Dux Bellorum mini-AAR

A couple of weeks ago the Picts and the Vikings had a rematch. If you recall, the Vikings trounced the Picts in the last game. This time around the Vikings were a more settled bunch, having invaded and taken land from the Picts, so I used the Saxon army list.

I decided to try some different strategies, so I opted for some War Pigs (War Dogs in the list) and I chose to try an Assassination. Steve had chosen War Dogs and Veterans, and I believe that he opted for very large numbers of Leadership Points (LPs) too. My army was bulked out with Ordinary Warriors to give me greater numbers. I feared that Steve would have loads of troops and that I might get surrounded and cut down rather too quickly.

The assassin was rubbish and failed to kill even the enemy leader's teddy bear, let alone assassinate the enemy leader, so we began the battle.
Note: Assassination is expensive. It costs almost as much as a unit of Noble Warriors. It also only has a 3 in 36 chance of success (causes the enemy to lose 3 LPs) versus a 10 in 36 chance of costing you 1 LP. The effect if it works is great, but I do wonder about its cost-effectiveness given that you have a three times greater chance of hurting yourself than you do of hurting your opponent, and even without an effect you are down a Warrior unit on the field. I'll still use it though. It would be worth it to see my opponent's face when it does eventually succeed!

With the pre-battle assassination attempt out of the way, we set up. I was the defender and had chosen a piece of impassable ground and a lake as the terrain.
The Vikings are in the foreground. Black dice are my LPs. Red dice are Steve's LPs.
I anchored my right flank on the lake and deployed my Nobles mounted together with their trusty War Pigs. I planned to defeat Steve's light cavalry and circle behind the enemy line, using the big rock as cover. Steve set up to flank me with his light troops while hammering me down the middle with his War Dogs and Warriors.
The Pictish light cavalry took fright at he approach of the War Pigs and headed for the centre, while the Pictish archers fired desultorily at my flank and failed to score any hits at all. My cavalry clashed with the light cavalry while the War Pigs headed round the big rock as planned. The Pictish War Dogs charged straight down the middle and hit my skirmishers. It was at this point that I started consistently failing to put my LPs in the right place. Note that the War Pigs have 3 LPs allocated to them and no way of using them. I managed to do that a lot in this game!
Blue dice represent Viking casualties. White dice are Pictish casualties.
The battle progressed. The Pictish warriors began to advance as the Viking cavalry sought to cross the battlefield. Casualties mounted and I really wished I had a traffic plan as my troops got in each other's way and I continued to place my LPs with the wrong units. Still the Pictish archers failed to score any hits though. Around this time I turned the War Pigs around to try to support their Noble masters on the horses.
Sadly, the War Pigs failed to reach the Noble Riders in time, and I once more managed to put my remaining LPs in the wrong place. At the end of the battle, the Pictish line had been broken and their numbers massively reduced but the Companions and the Veterans still remained. They were battered and bloodied but still they fought on, each declaiming their ancestry and great deeds as they fell to the Vikings. At last they were so worn out that the Pictish general fell. His veterans took to their heels and fled. The Vikings held the field and retained their small hold on Pictland. I had won despite every mistake I made!

It is clear that Dux Bellorum suits us well. The playing time is short enough for our regular gaming sessions and the strategies add the kind of colour that we like to see in our games. The armies are small enough that we could easily collect several too. It's like DBA but better!

Tuesday, 18 November 2014

Vikings invade Pictland - a Dux Bellorum mini-report

Last week we played Dux Bellorum. We are playing again this week so I thought I should try to remember what happened and post a short report before the new game completely wipes the old one from my memory. I fielded a Viking army as Land Raiders. Steve used his new Picts. This meant we knew who would win at the outset because my Vikings are veterans of many games and newly painted figures never win their first outing, except against other newly painted figures.

I had chosen Champion's Challenge, Fanatics and Mead as strategies for my army. I also bought an extra Leadership Point. Steve had bought an extra 3 Leadership Points, but I don't think he had bought any strategies. Steve was the defender and I was the attacker. He set up the terrain as you can see below and I chose to deploy between a field and some woods, forcing him to split his army so that it could move easily in groups. My champion called his out and won, reducing Steve's Leadership Points by one as a result of being demoralised at the death of their biggest bloke.

Vikings at the bottom of the picture
There was little tactical subtlety in the battle. I began by sending my berserkers (Fanatics) off on a charge against Steve's right flank (my left). I hoped that they would disrupt his formation while the rest of my force picked apart his main body.
Berserkers to the left of me, Warriors to the right, and here I am stuck in the middle with you
The berserkers saw off a unit of skirmishers but were very quickly cut down, so I sent a unit of warriors off to delay the enemy some more. They did this rather well which surprised me.
The main body assaults the Pictish main body and is threatened by the skirmish horse from behind, Meanwhile the warriors on the left are holding up twice their own number and winning. That mead I gave them sure paid off.
My warriors actually won on the left flank while my main body, fuelled by mead proceeded to pick apart the enemy. The game ended with the Pictish general surrounded and eventually cut down. His bodyguard died with him and will be remembered in our songs.
The poor surrounded Pictish general
This was a good fun, but brutal game. We got a couple of things wrong but not too much at all. The key to winning it for me was picking the right fights in the main combat. Rolling well also helped, but it is fair to say that the mid-game was characterised by my inability to roll fives or sixes despite rolling whole buckets of dice. I'm fielding the Vikings as Saxons in the next game and shall try some different strategies this time around.

Steve got frustrated in the last game because he did so little damage to my troops, but that did not stop him from declaring what fun the rules are. I concur. I am now planning an Elven army using the Late Roman list and a Norman army based on the Romano-British list. It may well be time to find my painting mojo again.

Friday, 17 May 2013

Tigers by the Tail - Tomorrow's War AAR

We played the scenario 'Tigers by the Tail' the other day. This scenario pits two ultra-high tech grav tanks versus five near-future tracked tanks in an ambush scenario. It is one of the scenarios from the TW rulebook and is there expressly for the purpose of practising the vehicles rules. We got some bits wrong, had a few questions about interpretation of the rules but generally had a great time: enough of a great time that I only remembered to take one photograph throughout the game!

Captain Kolawski grinned as the enemy tanks came into view. The trap was working well. He’d knock out the lead tank, while Sergeant O’Donnelly would take out the back tank. Between them they could wipe up the rest of the commies. He couldn’t believe they would have sent such pitiful vehicles into combat, they would have been out of date in his grandfather’s time. You could see the plumes of smoke from their diesel engines miles away, and as for the noise. “Rear vehicle destroyed.” Whooped O’Donnelly, over the radio.”They didn’t even see us.”
The two US grav tanks lurk menacingly on the far side of the battlefield. One DPRG tank at the rear of the column has been destroyed. One is about to exit the battlefield. Another has turned to face its attacker, while two others seek the cover of the woods
Just then the lead vehicle came into sight. His tank barely moved, as the main cannon fired. A satisfying burst of flame showed the hit on the viewscreen. The tank juddered to a halt, then in a burst of blue smoke the engine started again. Suddenly the radio burst into life. “This is General MacArthur-Park speaking. Could you give me an update as to your position, Captain?” “We have met and are engaging the enemy, Sir,” replied Kolawski.
(The only fog of war card that affected the game was one Steve drew. It involved high command interfering directly with events on the battlefield so he lost initiative immediately and could not regain it for the rest of the game. In the scenario the US force is meant to have initiative for the first two turns to represent their ambush.)

Just then the second tank appeared. Before Kolawski could react it had fired a shot at them. The shot pinged off the front armour. Again their own cannon fired, causing the track of the new enemy to uncurl from the left hand side. The lead tank lurched forward again heading towards deeper vegetation. Even with their advanced sensors it would escape in there. “Well done Captain, carry on and score one for the good guys.” Barked the General. Sergeant O’Donnelly’s voice came through the speaker. “Second tank has been immobilised, Captain. Going after the third…” The speaker blurted out static, then came a robotic voice. “The other caller has disconnected.”
(Yay, I managed to destroy one of the US tanks through its front armour! The US tanks had the advantage in being able to ensure that they present front armour at all times due to their superior mobility. This made quite a difference to my ability to hurt them)

Captain Kolawski frantically viewed the telemetry screen in front of him. The Sergeant’s tank was down and crippled, but all the crews life signs were in the green. Another shot lanced out from the crippled second tank and the tank rocked. “Guns damaged, Captain,” yelled Corporal Kennedy. “Get that tank put out of action now,” he ordered back. “Then after that other tank.” Their gun fired again, this time the crippled tank fell silent. The tank moved rapidly and soon they were behind the remaining tank. Just time for one shoot before it disappeared into the thick jungle. As the enemy tank fell into the sights the tank suddenly lurched and the shot went wide. “Damnations.” Cried Kolawski and slammed the panel in front of him. Still they had stopped three, but at the cost of one of their own.
(With the scenario over, we took stock of the damage. Steve had brewed up two of my DPRG tanks and immobilised one, counting three kills. I had exited two tanks and killed one of Steve's US tanks. The other US tank had a damaged gun, but that did not score any points. The final score was 6 VPs to Steve and 5 VPs to me. Steve won in what was a very close game.)

This was a great scenario to play as training for vehicle actions. I think we need to try it again, because I can see a range of opportunities for the US tanks to make this into a serious kicking for the DPRG. I'm less sure about the tactical options for the DPRG. Running seems to be the optimum strategy, or maybe forming the wagons into a circle in the woods and letting the US come to them. Winning reaction tests that allow you to move out of sight is obviously a good strategy too. Basically, the US forces control the action for the first two turns unless you are Steve and draw the wrong fog of war card. In those two turns, I think the US should be able to cripple or destroy most of the DPRG force, if they are canny and have a bit of luck. Hmm ...

Sunday, 28 November 2010

Game More!

Yes, play more games! Well, I have just had a most excellent weekend of gaming down in Chelmsford with m'buddies Derek and Brendan. Derek's sons were there too for part of Saturday and had a riot (not a student one!).

Nuclear War
I had not played this in ages but it is really easy to pick back up again. The games went quickly with much hilarity and picking on each other as much as possible. The first game proceeded with a clear demonstration that the participants of the game were largely warmongers with a couple of clods that might inadvertantly cause a war instead. The second game was much the same, but it also provided a clear demonstration of the insanity of mutually assured destruction as a doctrine; I was wiped out first, but my retaliation killed Derek and Elliot. Their retaliation then wiped the other two out. Ouch! All in all, it was a brilliant game and well worth returning to after all these years.

Groo the Wanderer
Groo is a very stupid barbarian who inadvertantly destroys pretty much everything around him. You are the mayor of a town that Groo is likely to visit. Your goal is to build up your town before the others while avoiding Groo's visits. This is a card game based on the brilliant comic by Sergio Aragones. The game plays quickly and saw all of us trying to ensure that Groo spent more time at our opponents' towns than at our own. We laughed, we howled, we cursed each other. Yup, definitely one to return to. Again, like Nuclear War, I have had this game for ages but not played it often enough.

Shadows over Camelot
I had never played this before. The idea is that each player is a knight of the round table. You are supposed to go on quests to recover the Holy Grail, Excalibur and Lancelot's Armour, which help you win the game. Each quest puts one or more white swords on the round table. When there are twelve there, you have won. The twist is that one player may be a traitor. A card is dealt to each player that tells them whether they are the traitor or not. The traitor is trying to get seven black swords onto the round table or to place twelve siege engines outside Camelot. Siege engines can get placed by the knights, because they have to take one evil action in their turn as well as their good actions. Black swords are placed by failure to complete quests or by falsely accusing a good knight. It is entirely possible that no traitor is present, but I wound up being the traitor. Not knowing the game, I just played it gormless and eventually wound up in position to place the twelfth siiege engine and win. I was never unmasked as the traitor (yay!) and enjoyed the game a lot. It was tricky trying to make sub-optimal plays all the time, but that just added to the fun.

Fire and Axe: a Viking saga
This has to be one of my favourite games ever. You play a Viking, whose goal is to trade, raid and settle your way into the history books. In this game you can settle the New World, pillage Rome or Constantinople, or sail down the Volga to trade in the East. The length of the game is controlled by the saga cards. There are nine of each type and the game deck is made up of six from each level. The saga cards describe activities that you must complete to score them. The person that completes the final element of the saga gets the card and the cards can be worth points at the end of the game. I really like the fact that there are several ways to score points and win the game, and the game play is tense as people compete to score the saga cards. It is rarely evident who will win until the end and the final scoring is done, which enhances the experience. This was a really competitive game and the final scores were close. Most excellent.

Overall, this was a brilliant weekend and all the games we played were fun. It helps to have great people to play with but the games themselves are all ones that I would recommend too and enhanced the whole thing. If you are tempted, you can check the games out at Boardgamegeek by clicking the links in the game list to the right.

Monday, 28 June 2010

The Best of All Possible Mining Outposts - A 5150 report

Captain Pangloss of the Bwendi Levy was engrossed in his book when the alarm call came; he loved reading about his ancestor in Old Earth history books.

"Captain," yelled Sergeant Candide through the commlink, "We've got incoming. Unidentified space skimmer approaching. We don't recognise the type or the markings. Looks like it might not be ADF this time."
"Very well," responded Pangloss, "Sound the alarm and get your men deployed to meet them. They could be friendly but let's not take any chances."

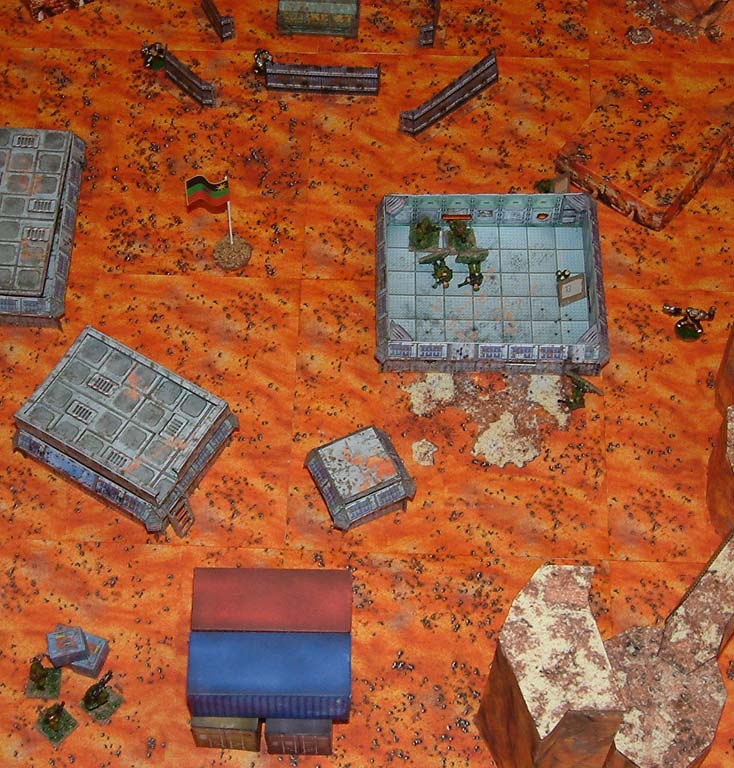
The Levy stumbled over each other as they took up positions, but Pangloss was not too worried. The men might be green but they had the best of all possible commanders in Candide and Pangloss. Sgt Candide had taken half the men and was covering the left flank from the roof of one of the supply huts, while Pangloss and the rest of the men occupied the main command hut, which provided both good lines of sight and a comfortably fortified position from which to observe the approach of these newcomers. They did not have long to wait. Gunfire from Candide's position indicated that the newcomers were indeed hostile. Then the gunner spotted one of the enemy, as did Pangloss. Blimey, these were proper aliens and of a type that he had never previously encountered. They were huge and heavily armed. Pangloss opened fire at the alien, scoring multiple hits but it just kept coming until the gunner stitched a burst of fire all the way across its head. (click the pics for larger images)
Over the intercom, Pangloss could hear the shouts of Candide's men and Candide's orders. It all sounded rather chaotic, but that was for the best because, if it were not chaotic there, it would have to be chaotic somewhere else, as likely in Pangloss' ad hoc command bunker as anywhere else! As he thought this, suddenly a hail of automatic fire ripped into the walls of the hut and several shots came through the window, tearing chunks out of the gunner and his number two. Both men dropped in a pool of blood. Pangloss immediately raced over to grab the gun and keep it in action. It's firepower could be crucial. Then Private Thunder-Ten-Tronckh collapsed in another welter of automatic fire. Their position had been flanked and the troopers Pangloss had left outside had been dispatched rather too quietly. Over the commlink he could hear Candide rallying his men, who had lost their courage in the face of overwhelming enemy firepower. Candide was now manoeuvring to assault the enemy again. Perhaps he could flank them as Pangloss had been. Still, it was just as well that Pangloss had been flanked because otherwise it would have happened somewhere else and Pangloss was better able to deal with such a situation.
Candide's men were now moving into position as Pangloss sought out the cause of the problems round his own command. It turned out to be a single alien with two unfeasibly large machine pistols. Pangloss was impressed despite himself. Surely those must be the best of all possible machine pistols! That did not stop him letting rip with the LMG though. His burst of fire tore visible holes in the alien's armour and made it duck for cover. Unfortunately it did not appear to be hurt.
As Pangloss adopted a suitable firing position, the alien suddenly appeared at the window again. Private Cunegonde was frozen with fear and the alien dropped her where she stood, with her weapon unfired. Pangloss was alone in the hut. Over on the other flank, the cries of the wounded could be heard, as were the exhortations of the routed. It sounded like Candide's command was running for its life. That was probably for the best. Pangloss dropped back into the corner of the hut and prepared to resist the aliens when they came for him. He was the last of his command and in this situation going down with his ship was the best of all possible outcomes. The end did not take long. The big alien stepped into the window and stood there as Pangloss opened fire until his gun clicked empty. With unfeasibly large machine pistols opened fire and Pangloss collapsed on the floor. As blackness overcame him he reflected that he had at least held the best of all possible commands in the best of all possible mining outposts.
Steve decided to field some aliens for a change and I had been making some 15mm terrain using the WWG Mars Station set, so we agreed a 1500 points battle and bought figures accordingly. He had 4 aliens using the Grath template. I had a 14 man levy squad, most of whom were Rep 3. The game progressed rather predictably. I did manage to hit the aliens but could not get the OD results I needed to kill them, except in one case. My efforts were not helped by the vast number of 1s I rolled to hit. I also spent half my time rallying my troops, instead of having them shooting back. Steve's shooting was much more effective. I think he has loaded his dice or something! It was a fun if frustrating game that saw my star (Pangloss) getting captured. I wonder what the aliens will do with him, and is he important enough for my troops to rally and try to rescue him? Half of them survived by routing very soon after the aliens started shooting, and a few could test for recovery if the aliens did not gather up the wounded and take them off to be probed.

Tuesday, 8 June 2010

The Bwendi Strike Back -a short 5150 report

Following their disastrous performance last time around the Bwendi army has been training hard to retake Gondwoddle. Unfortunately, in the time it took to muster the troops and get them there, the ADF has already laid waste to the village itself and are preparing for a new murderous onslaught. The village was only occupied by the dregs of ADF society, the militia, but there were a lot of them. Like cockroaches they were swarming all over the place. Time to clean house.


The Bwendi squad advanced on one flank with the intention of eliminating the militia one piece at a time. By focusing their attack, they hoped to avoid unnecessary casualties. They came under fire quite quickly but suffered no casualties and were able pin the ADF while a flanking fire team worked its way around. With their flank under threat, the ADF chose to manoeuvre to defend it. Unfortunately, their supporting troops were all laid low by the flanking force.


The ADF chose to regroup in the lee of a large rocky outcrop, just in time for a reinforcing Bwendi squad to appear and mow all bar their leader down. He immediately surrendered and will be interrogated before being put on trial for his war crimes.


This was another quick game that showed the advantage of having higher Rep troops. My chaps were able to close quickly and lay down more accurate fire than Steve's were. On the last turn I received reinforcements and that totally sealed the fate of Steve's troops. It effectively doubled the strength of my force while Steve only had four figures left. For future games we have decided to field a platoon each rather than just a section. This should reduce the effect of any reinforcements that appear. We want them to be a fun addition and not a totally devastating, overwhelming advantage for the recipient.

Sunday, 6 June 2010

ADF Attack Bwendi Again - 5150 report

In a not particularly shocking development, the Albion Defence Force has recently attacked the peaceful Bwendi settlers once more.

The scenario was a perimeter patrol with the Bwendi defending. I chose to set up one squad in the woods and one in the village. Steve's ADF troops entered on turn one.


In a short but bloody firefight, the ADF troops captured the village of Gondwoddle and drove off the Bwendi settlers with overwhelming firepower.

Basically, Steve's troops entered the table, I passed a couple of In Sight tests and shot at him but missed. He returned fire and knocked down several of my troops, as well as putting one out of the fight. I failed to activate any of my troops for the first four turns of the game because of rolling too high on the initiative rolls and so he was able to waltz up and take out my troops at will. I did take out a couple of his soldiers but not enough to do any serious damage and certainly not enough to recover from my poor initiative rolls.


This was a quick and fun, but one-sided game. The Bwendi people will have their revenge!

Friday, 4 June 2010

Massacre in the Market - a short Chaos in Cairo report

Well, I have been somewhat remiss in posting to this blog of late. I have several battles to write up and some newly painted figures to post. Unfortunately I have also been snowed under with course work and with helping my wife out in her business. Anyway, here follows a short account of a battle that took place in the sukh in downtown Cairo. We fought this one a few weeks ago so my memory of the details is a little hazy.

The market was busy that day so it was pure bad luck that Sabine Blankensee encountered the Sword of Ra. In those crowds it would have been easy to walk right past him. She stared balefully at him as he yelled threats and the crowds cleared around them. Sabine manoeuvred to keep some of the bystanders between her and the burly warrior that faced her. Then, whipping out her pistol she blazed away. The fight was on.

(As usual click the pictures for a larger image)


Fortunately for Sabine her allies were close by and moving in to help her. The Sons of Set charged up the street while the others tried to flank the Swords of Ra, who seemed to be springing up all over the place. Unfortunately the Swords seemed to be well armed with rifles and swords. Sabine's .38 Special seemed rather lightweight by comparison.


While the others distracted the Swords with gunfire, the Sons of Set charged in and made short work of a dervish, who seemed better at posing with his swords than using them. While they were doing this, Benny Khotan was laid low by a rifle shot and an innocent bystander was also hit. The Sons charged on and engaged the first Sword that Sabine had seen in a wild swirling melee that dragged on as neither side could gain a significant advantage.


Another Sword joined this melee, using a passer-by as a shield. Just what you would expect from such dastardly foes! The fight raged on and the Sons of Set were whittled down as another Sword engaged them. Sabine leapt into the fray with her pocket knife and soon settled the hash of the Sword before her. The fight seemed to go out of them after that and the other one was also soon laid low.


Suddenly quiet fell over the sukh. The Swords were all down. Unfortunately, Sabine's allies Benny, Ahmed and Singh were also down. The Sons of Set had been whittled down to two remaining. Sabine was badly hurt and her dress torn. The only one of the group that remained unharmed was Otto, their leader, who had personally accounted for two of the Swords in his own quiet way. They gathered up their wounded and tended to their wounds. It was only after seeing to Benny and Ahmed when Otto realised that the Swords had slipped away despite their wounds. Worse yet, they had captured Singh, Otto's bodyguard! Benny and Ahmed were particuarly irked by this. They both swore blood vengeance against the Swords of Ra. Woe betide the Sword that got in their way in the future!

This battle went badly for me at the start. My attack rolls were poor and my defence rolls not much to write home about. Steve seemed to rolling an absolutely blinding game, yet, when it came to the end, I suddenly found myself holding the field. I have no idea how that came about, unless it was the careful use of innocent bystanders as cover and generally nasty tricksy behaviour on my part. However, despite winning the game I still found myself with one of my characters captured. How does that work out? The rescue mission should be an interesting one. As Steve put it, I won the battle but lost the war. We shall see.

Sunday, 28 February 2010

One Night in Cairo - A Chaos in Cairo Battle Report

It was a dark night on the streets of Cairo and few were abroad. Cordelia Case, Action Girl(tm), was grateful for this. Her sources had told her that a Shard of the Nameless One had been recovered by an Arab labourer during a recent dig and hidden in a relative's house. She had also heard that her arch-nemesis, Tutancomein, was hunting for it too. She rousted out her companions and headed for where rumour told her that the Shard was. As she approached this small suburb of Cairo, she realised that the evil mummy was already there too. This time he appeared to have a human guide with him. So that was how he had learned so quickly of this Shard! (Click the pictures for larger images)


Steve took a Mummy Warband while I took an Archaeologist Warband. We rolled for scenario and got 'The Package'. There would be six packages on the table.. One contained the Shard, but we would not know which one until the end of the game, so we needed to collect as many of the objective markers as possible. For a sub-plot we rolled The Traitor. One of us would receive an additional figure, but if we ever rolled no successes for initiative then the traitor would join the other side. We diced and Steve got the extra figure.

Cordelia and her companions advanced quickly towards the buildings where the Shard might be hidden. A shout from her left told her that her brash American companion, Colin Fraser, had found a package that might be the Shard. Fraser was a useful man to have on an expedition, not too bright, but good with a gun and his fists.


Fraser ran from the building with the package as Professor Bartholomew Bennett, Cordelia's research associate, found another package. Randolph Dacre, the expedition's backer had also found a package by now. He ran from the building where he had found it and passed it to the Professor. With both packages, Bennett headed for home. The others could deal with the situation that was developing. There would be fighting soon, because the mummies were closing on the heroic archaeologists of the Riverview Antiquarian Expeditions Society. The professor was not so handy in a fight, so better that he get the packages home and start checking them out.


Dacre and Fraser advanced to join Cordelia and Geoff Grimes, the final member of the team, just in time for Dacre to help Cordelia knock out one of the mummies that had shambled forward faster than its fellows. Grimes had climbed to the roof of a nearby building, from where he had a good field of fire with his rifle. He also found a package on that roof, which was an added bonus. Stuffing it into his pocket he began to lay down covering fire. The fight now developed in earnest. Fraser blased away at the shambling henchmummies with both pistols. Cordelia ran up behind them and blasted them with her shotgun. The mummies were soon a pile of rotting wrappings on the floor. Meanwhile Dacre shot down the human traitor, serving the mummies for his own profit and to the detriment of all humanity. Unfortunately, some of the other mummies had found more packages and were escaping with them. Time to give chase.


Cordelia and Dacre chased after them and were soon engaged in a close combat that saw the pair of them knocked out, but not before wounding the one remaining mummy. Geoff took aim and finished it off with a shot from his rifle. The silence that suddenly broke out was deafening. The remaining mummies had fled with their packages. All that remained in the streets of Cairo were the unmoving bodies of the wounded. Geoff moved forward and helped bring round his companions, more worried about helping them to safety than dealing with the mummies and their human stooge.


With the group home, they checked their packages and found the Shard. Success! They had won, but at a cost. Cordelia would be bed-ridden for a while (casualty check resulted in her missing the next battle), while Dacre was limping badly (-2" movement during next scenario). They hoped that the mummies would also have suffered equally (as it happened, Steve permanently lost a couple of henchmummies, but all of his character mummies will be present unhurt in the next scenario. Boo!). At least Cordelia would have time now to focus on her next action-packed book. The night's adventure had the makings of a great story and she was sure it would sell well.

The scenario played quickly for our first playing of Chaos in Cairo. It was very enjoyable and the only thing that we changed was the Coup de Grace rule. We agreed not to use it because of the increased possibility of permanent character death, which was just as well. Had we used it and had Steve had time to do so, Cordelia would have been dead dead dead, and, if I recall correctly, so would Dacre. In terms of experience, Colin Fraser gained enough to gain Combat Attack as a new skill. The others all gained some experience and should see advances after their next battle, if all goes well. Our next game will feature the Servants of Set (me) versus the Swords of Ra (Steve). Next time I get to be evil, bwa ha ha ha ha! I think that we shall be playing this system quite a bit more.

Thursday, 11 February 2010

Against the Ungeheuer - A Broadsword Adventures AAR

Carmen, the buxom daughter of the landlord at the Fang and Flagon had been captured by Ungeheuer! The regulars at the Fang and Flagon were horrified but endowed too well with a sense of self-preservation to go up against such fearsome monsters, so it was up to the newly arrived adventurers in town. Two of them looked fresh out of the warriors guild, while the other two were battle-hardened and scarred, clearly veterans of many fights. The promise of gold and free ale was enough to pique their interest, so they set out on the trail of the monsters and soon arrived at the entrance to a large cave. (click the pictures for larger images)

The area was strewn with chewed bones and remnants of equipment from previous adventurers that had dared to enter this place. It stank too, foetid and warm. Bravely they moved into the gloom within, pausing only to light their lanterns. All was quiet to start with, but as they explored the caves either side of the entrance, a shuffling gait was heard coming from deeper within. Soon a shaggy monstrosity was sighted by one of the younger warriors. He grasped his spear more firmly, sweat breaking out on his forehead in his nervousness at his first fight.

As the monster came towards him, he cold see that it was still drowsy from its last meal and sleep, but that did not stop it from letting out a howl of fury at this intrusion. The warrior, undaunted, charged forward, thrusting with his spear. The point took the monster in its eye and travelled on up into its brain. It stared disbelievingly at the puny-looking warrior, before slumping to the floor in a pool of blood and brains, dead.

More howling was heard from deeper with the cave and a new threat could be seen lumbering towards the adventurers. The monster's mate was furious at the treatment meted out to her companion and was clearly out for revenge, her gaze focused on the gore-encrusted spear of the young warrior.

As she attacked, the warrior was able to fend her off, and then he counter-attacked, deftly manoeuvring her around so that his companions were now able to surround and attack her too. She roared in pain as weapons stabbed at her and flailed around, desperately trying to hurt her tormentors, but the end was not in doubt. Soon she fell with a dozen cuts to her body and a sword in her head.

With the monsters dead, the adventurers were able to search the caves in peace and soon found Carmen alive and unharmed. They returned home in triumph.

This was a fun little scenario from the rulebook that went particularly easily for Steve's adventurers. He had two Grade 2 characters and two Grade 1s. In Broadsword Adventures, there are three grades of character available. Grade 3 is a bona fide hero, Grade 2 is a stalwart adventurer and Grade 1 is cannon fodder. Imagine my chagrin then when my first mighty monster was attacked by a Grade 1 spearman and slain instantly with a blow to the head! Bah!! Well, thought I, the second monster will at least take one of them out. I shall be revenged!!!!! With the first monster spotting the adventurers, the second one was no free to act. I rushed her to one of the interior cave mouths, thinking to use the narrow opening as a way to hinder the adventurers. Unfortunately the same devilish spearman as killed the first monster won the melee round by a large margin and was able to use his skills to swap places with her, turning her around and getting her surrounded by the enemy. In Broadsword adventures, certain skills give you combat manoeuvres like this that you can use. I then proceeded to try to hit the adventurers and failed miserably, while they cut holes in the monster's hide. The end was really not in doubt. Steve's dice were hot, and mine were ice cold. All in all, it was a great game. The scenario was simple but we wanted to learn the differences between BA and our more usual fare of 45 Adventures, so that was not a problem. We both had fun and Steve went home with a huge grin on his face, having won a game, so we can definitely account this one a success. Time to prepare the next scenario.

If you want to check out Broadsword Adventures, you can download the demo rules free from the Rattrap Productions Speakeasy. The download is in the Broadsword Adventures download section and includes the scenario that we played plus some characters for it.

Friday, 22 January 2010

Basic Impetus

Steve and I played Basic Impetus last night using our 6mm Wars of the Roses forces. It was an interesting game and the battlefield looked huge with the small forces on it. Unfortunately I did not get any pictures of the game, but I shall do so next time we play. The game went very smoothly for a first-time playing and we had few questions about the rules, although we did forget half the rules for half the game. We shall get it right next time around! What was important was that the game flowed nicely and that we both felt like we had a chance to win.

Steve's Lancastrians (boo, hiss!) were the attackers, brutally assaulting my poor, heroic Yorkists. We both deployed in proper fashion with archers to the fore and billmen/men-at-arms behind the archers. I had a unit of mounted knights on my left flank and a unit of handgunners on my right. My plan was to pin his troops in the centre with my archers while the more mobile troops went around his flanks. Steve had chosen to dismount his knights and had two units of border spears, so he had the advantage in heavy infantry, while I had more archers than he did. My left flank was on a gentle hill, while Steve's right flank was anchored on a pond.

So, the battle began. We advanced towards each other until we got to archery range, at which point we began to exchange arrows. My knights and handgunners began their move around Steve's flanks. Feeling threatened by this, Steve pushed his billmen forward too quickly. My men-at-arms and billmen charged forward to counter their advance and routed them in short order. "Ha!" thought I, "He has let himself get sucked in and will pay for that mistake." I promptly charged my heavy foot forwards and suffered the same fate as Steve had. Oops! meanwhile, his spears were marching around my flank and trying to engage my archers from the flank. They did not quite manage this and were soon suffering as they took a couple of volleys of arrows and then found that the archers were actually a match for them in the melee too. Blimey! My handgunners were now causing problems by harassing the flanks of the rest of Steve's formation, but in return my men-at-arms were getting the worst of the melee in the centre. Then my knights finally finished poncing around on the flank and charged home against Steve's archers, driving them from the field in short order. They promptly turned around and charged home against the rear of Steve's dismounted knights. Caught between two of my units, his knights chose discretion rather than valour and fled the field. Game over.

The game took around an hour and a half to play through including time spent scratching our heads wondering what the rules meant, and was very good fun. There are some gaps in the rules, but that is hardly surprising because they are a stripped out version of Impetus, but they worked well, so I would recommend them to anyone else. I also like the smallish size of the armies in the game. It makes it easier to collect several different armies, which appeals to me. The armies are larger than DBA armies and the games are slightly longer, but I preferred the game play to DBA, which is the nearest equivalent style of game I can think of. So, which army shall I put together next?

Friday, 11 September 2009

Bwendi Heroes Save Bwendi From ADF - FWC BatRep

Once more the perfidious aggressors from Albion have tried to invade Bwendi and been thrown back by the heroic Bwendi people. Their technology is truly no match for our spirit and elan. Thus spake Throckmorton P. Gladiolus, President for Life, at a press conference late yesterday following the startling news of a new Albion incursion onto Bwendi. The Albion invaders had landed in the back country of Bwendi near a vital industrial facility that produced much-needed fertiliser for the stout Bwendi yeoman farmers. The Bwendi Fast Response Team had reacted quickly (well, obviously!) to deal with the threat and had rapidly neutralised it. This is the story of that heroic action.

We played FutureWarCommander last night. It was my second game ever and Steve had not even read the rule book, so it was all down to me. I had played one game previously against Steve Kelly, who had played before so I had some grounding in the game but not much. At least I had read the rules though. That did help a bit. Nevertheless, I am sure that when I re-read the rules I shall find plenty of things that I got wrong.

The scenario was a simple 2000 point encounter battle. I had two troops of Thor MBTs, each with one Smart Missile carrier to provide heavy fire support, and one platoon of infantry in IFVs (Breakpoint 7). Steve had three troops of armour and two platoons of infantry, one of which was in APCs (Breakpoint 12). The game began with me taking the first turn.

The leader of the FaRTs looked at the oncoming enemy armour and ordered his tank commander to engage it at long range. There were a lot of guns heading their way and the FaRTs looked a little thin on the ground. His radio hissed and squealed as he spoke into the microphone and he watched as the entire armoured column advanced at full speed before suddenly stopping without even firing at the enemy. Fire was coming in thick and fast but the FaRT tankies were happily just motoring along. What the heck? Then he ordered the infantry forward to the small township of Gladioli ahead of them. The radio hissed and squealed some more and then it went dead. The IFVs stood stock still. Meanwhile the ADF commander was making the most of things and firing for all he was worth. Very soon three FaRT tanks were in flames and others were buttoned up and hoping for the best. Confusion reigned among the FaRTs and there was no doubt that their CO would be raising a stink about this if any of them survived. Things improved marginally as the missile tanks began to engage the enemy and smoked two of the enemy in return. The IFVs engaged an APC heading for the town, leaving it a blazing wreck too. "Well," thought Colonel Neryngia, "at least we are giving a reasonable account of ourselves."
(Click the pictures for larger versions)

Turns 1 to 3 passed very quickly in a welter of command blunders and failed command rolls for the FaRTS, while the ADF used the opportunity to engage and destroy a bunch of FaRT tanks. The FaRT HQ blundered with his first two command rolls, while the FaRT CO just failed the first three completely and my troops did nothing except fire using opportunity fire at the enemy. At least that did some damage although I was still losing on points at this time. Every vehicle of mine that was hit in these turns also managed to be suppressed, while none of Steve's were. It looked like the game would be a total walk-over for Steve.

After performing some percussive maintenance on his radio, Colonel Neryngia was finally able to talk to his troops properly. An ADF recce vehicle had taken up station in the woods near his command post so he ordered his infantry to assault the woods and clear them. This they did very easily before mounting up again and heading towards Gladioli. Enemy infantry had been sighted within the town and his men would have to clear it. The enemy armour was now advancing on the FaRT tanks though and another of his precious Thor MBTs was in flames. Things were really not looking good and it looked worse when one of the IFVs was hit as it tried to flank enemy positions within the town. Fortunately the infantry inside were able to dismount in time and survived. The rest of the infantry pushed into the town and assaulted the enemy troops there, only to find that they were power-armoured and pretty tough. The men retreated back through the town. At least Colonel Neryngia's radio was working properly now.

Turns 4 to 6 were much better from my perspective. My armour still spent most of its time suppressed, but at least my troops were able to do stuff as I passed a couple of command rolls. The ADF meanwhile was still pressing on and getting their command rolls just fine.

Then the battle really started to improve. Seeing the casualties caused by assaulting in the town, Colonel Neryngia ordered his men to just lay down as much fire as possible against the enemy. They would drive them out by superior firepower. The IFVs and the infantry concentrated their fire against one enemy position after another. Very soon they had cleared large areas of the town for only a few casualties. The armour was starting to get the range too. Several more enemy tanks went up in smoke. As night fell, the enemy withdrew in good order. The FaRTs held the field.


Neither of us reached our breakpoint by the end of the game. My force had taken 6 casualties in total and was one point away from breaking. Steve's force had taken 8 or 9 casualties and was further from its breakpoint than mine. We totted up the casualties. I had amazingly caused more damage than Steve had so I won a minor victory, which the Bwendi press wrote up as a stunning defeat for the ADF.

All in all it was a good game despite lack of familiarity with the rules. We played it straight and removed hits at the end of each turn. There is an option for retaining hits. Had we done that, I would have had no armour by the end of Turn 3 and the game would have been over much more quickly. Steve would have taken more casualties too, but not nearly as many as I would have done. My main problem was that most of my armour spent about half the game suppressed and unable to do anything except fire in opportunity fire. One it got moving though, it was able to do a bit of damage. The command system is really good fun in FWC. It is frustrating that you are not guaranteed at least one action per turn, but it also offers the opportunity for some really good bouts of action. At the end of the game, in the final turn, I managed to make loads of command rolls with my infantry and we were able to clear a large chunk of the town as a result.

Friday, 14 August 2009

Play Day! (Impetus and FutureWarsCommander)

Yup, I had a play day yesterday. Steve (of steves blog) was in the country visiting his brother, who lives about an hour or so up the road from me, so we arranged to meet up. He brought his Wars of the Roses figures with him (all Baccus 6mm) and a couple of Dark Realm Miniatures armies for FutureWarsCommander. If you have not read Steve's blog, you should at least check it out; his figures are beautifully painted.

He managed to find my house eventually, after a dreadful journey down past York. One brew later and we set up for the first game. Steve had mentioned Impetus on his blog before and I have been reading reports by other people too, like JET on Geektactica. These all made the game sound interesting. I had also downloaded Basic Impetus, a free DBA-esque version of the rules from the website, which had whetted my appetite for the game. It looked interesting, and I was not wrong. Steve had mentioned on the phone earlier in the week that he had some reservations about the rules after his first game, so I was wondering if they would live up to my expectations. We set up the game. I took a Lancastrian Wars of the Roses force and Steve took the Yorkists. Both armies were Steve's.

We deployed roughly opposite each other and commenced the archery duel, which was not particularly decisive but did disorder my archers fairly quickly. Our mounted units charged towards each other on my left flank, while the rest of the troops tried to remove disorder and advance. As we closed the archery became more furious and units started to really get hurt, with Steve's men taking the brunt of it. Meanwhile the mounted knights were in a ding-dong battle that raged back and forth across the field. My knights got the worst of it in that melee and were quickly reduced to a strength of 1. Ouch. However, despite, or possibly because of, being outnumbered they rallied and fought back even harder. Meanwhile, my archers had destroyed a couple of Steve's archer units and my melee troops stormed into the combat. Very soon the battle was over and the Yorkists were fleeing for their lives.

This was a great fun game. I don't think we used all the rules in the Impetus rulebook, but it flowed well and was thoroughly enjoyable. I liked the idea of selecting which body of troops you wished to move and dicing for their initiative versus your opponent rather than rolling initiative for the whole side. That keeps both players more involved in the game all the time and adds a layer of interesting decision-making to the game. I also really liked the fact that melee continues until one side is destroyed or has fallen back beyond the pursuit range of the other side. This makes melee quite deadly really but also led to a real back and forth battle between our knights. The quality of the rulebook is also exceptional. It has thick glossy pages that feel like they will last well. The illustrations are inspiring and there appear to be plenty of examples too. Overall, I have to say "thumbs up" for Impetus and it is now on my shopping list. Oh, and Steve's reservations about the rules? Well, it turns out that he had drunk rather a lot of alcohol before he even began that first game ...

We broke for lunch and then set up a game of FutureWarsCommander. I have had these rules for a while and it is on my regular opponent Steve's and my list to play. Yes, my regular opponent is called Steve too. That makes it rather confusing but I shall not mention him again so any references to Steve will henceforth refer to Steve of 'steves blog'. So, as I was saying, I have had these rules for a while and have been really keen to try them out. I painted up my Scandinavian Union force a while back, as regular readers of this blog will know, and had previously only used it for Dirtside 2. Steve used an Andrayadan force from Dark Realm Miniatures for this game. We picked 2000 points of troops and set up a quick encounter battle so that we could get rolling dice asap.

It all started so well. I discovered that my troops had firepower and range over Steve's force. Brilliant. In the first four turns and almost completely annihilated one wing of his army as it tried to advance on me and had reduced Steve to one point from his breakpoint. My own casualties were minimal so far. At this time I was feeling rather guilty. After all, I had won the first game and it would be rude to win the second game in such a manner. Then on Turn 5 both my HQ and my CO failed their first command rolls. My troops stood there like lemons while Steve's advanced. I started to take more casualties. On the following turn my CO again failed to activate anything while my HQ was trying to manoeuvre his wing over to the other side of the table. And that's when it happened. Steve's troops activated and activated and fired and fired and my troops started falling like flies. In the space of one turn the whole game was turned on its head and suddenly my troops reached their breakpoint. I now had to roll every turn to see if the commander would order a withdrawal. He passed the first time but the troops took so many casualties on that turn that there was only a minimal chance of succeeding at the withdrawal roll on the following turn. I rolled. I failed. My troops fled the field. Victory to Steve!

This game was brilliant. The command system is very neat and offers all kinds of possibilities for problems and amazing successes. The game flowed really well and there were no problems. We did spend a bit of time looking things up, but that was because neither of us was particularly familiar with the rules. I can't wait to get another game of this in and am even wondering whether I should collect a new army for it. The question is, which army?

So, a big thank you to Steve for an excellent day's gaming.

Saturday, 1 August 2009

Albion attacks Bwendi Again - Dirtside 2

I have owned Dirtside 2 since before 1997 and after 1994. I know this because I remember buying it in the comics shop in Bedford when I worked for the archaeology unit there and those were the dates of my sojourn in Bedfordshire. However, I had never played the rules until this Thursday just gone. That is a shame because we had a cracking good game and the rules worked really well. I had feared that they might be a bit crunchy, but as it was they actually played very smoothly. The only downside to the game is that it was very one-sided and Steve took the brunt of the bad luck. I do prefer a closer match.

We chose to fight a standard 3000 point encounter battle, with each of us setting out 3 objective markers. The markers were all drawn randomly from the pool of objective markers so we did not know what points values each of us had drawn. All of mine were worth one point each. Bah! I found out afterwards that Steve had drawn two 2s and a 3! One objective marker had to be placed in our rear areas (the third of the table closest to our base edge), while the remainder had to be placed in the centre third of the table (the main battle area). The red circles on the set-up picture below show their locations.

My force consisted of the HQ group, two tank troops, two armoured infantry platoons and a heavy SPG troop. Steve had, if I remember correctly, an HQ group, two heavy tank troops and an armoured infantry platoon. I outnumbered him significantly and, as I found out, he had taken a totally different approach from me to building his force. I bought small tanks with big guns and very few frills. Steve bought big tanks (his Scotia tanks were twice the size of mine, literally!) with smaller guns but loaded up with stealth options.

The Set-Up (click pic for larger version throughout)

One unit of Steve's tanks is missing from this picture (on the far right) because of the limitations of my photography expertise. The arrows show the approximate movements of the units throughout the game.

Steve began the game by advancing a unit of tanks down his left flank. I promptly proved that I had actually read the rules by declaring opportunity fire. Three hit rolls later, two tanks were in flames and one had suffered a catastrophic failure of all its systems and it had also lost its drive train. The systems could be brought back online but it would never move again.


On his right flank, Steve moved a heavy tank troop into the military industrial complex to seize the objective there. I responded by advancing my headquarters troop to try to drive him from it. Suddenly all the target training I had given my troops seemed to desert them. They were right up next to these tanks and could not hit a thing. Fortunately, Steve seemed to have forgotten to train his own troops in how to shoot too!


Meanwhile, in the centre of the battlefield, Steve advanced his infantry forward and I did the same. My green troops advanced into the woods in my rear area to seize that objective and never moved from there for the rest of the game. Did I mention that troop quality was determined by a chit draw? I drew 2 green units, 1 elite unit and the rest were average. Steve's troops were all average and mostly with average commanders, while my command ratings were all over the place. In the picture below you see me triumphantly moving my troops up to the edge of the middle woods, supported by an armoured troop, and loudly declaring, "Hah, this objective is mine!" I then realised that the objective was actually in the woods at the top of the picture and said, "Oh, bother!" Doh!


I did move my infantry up to the woods with the objective in later, and managed to hold it. Steve brought his infantry up to try to take it, but I countered with some devious tank movements to chase his APCs off. Meanwhile, I had managed to smoke two of his tanks in the industrial area, had finished off the third one on his left flank and had occupied five of the objectives. At that point I declared game end. Under the rules, once you control more than half the objectives, you can declare game end. That said, it had not been easy. I spent many turns failing to hit Steve's vehicles. Similarly, he failed to hit mine and the one time he did, he scored a firer systems failure; the gunner pulled the trigger and the blue screen of death showed up instead of brewing up my APC. Such was Steve's luck throughout the game.

The final situation with arrows to show approximate troop movements:


The game was great fun and we played it through in 1.5 hours despite never having played before. The rules worked smoothly and the only thing that spoiled the game was Steve's abysmal luck. I'm sure he will do better next time. From my own perspective, I got the impression that numbers will tell in DS2; the more shots you get off the more chance you have of hitting and hurting the enemy. Steve's lack of numbers was a contributory factor in losing the game. The stealth systems he had worked well though. I spent several turns firing everything I had at him and missing every single time! I do like the opposed die roll system for hitting. That works well and is fun. It also keeps both players involved all the time, as does the alternate activation mechanism, where each player alternates activating one unit at a time. All in all, DS2 s well worth trying if you like 6mm sci-fi and it is available free from the Ground Zero Games website.

Our next planned game will be FutureWarsCommander using the same figures. We shall also return to DS2 but with bigger forces and more variety of vehicles.

Thursday, 9 July 2009

A Mammoth Task - Tusk Battle Report

Og hunt big food. Big food drink. Og hunt big food while big food drink. Big man dead. If Og hunt well, Og be new big man. If Og not hunt well, Ug be new big man.

We played Tusk last night. The scenario was that the chief of the tribe had died and the hunter that killed the most mammoths would become the new chief.

Mammoths at the watering hole (Click the pictures for larger versions)


Ug know what to do. Ug send hunters forward fast. Og know what to do. Og keep hunters hidden. Ug's hunters drive big food towards Og's hunters. Og clever. Ug stupid.

The game began slowly with my hunters not wanting to move (low activation die rolls), while Steve's troops advanced quickly forward. The mammoths started having to take reaction tests. Most grazed, but one decided to withdraw quickly away from Steve's hunters and toward mine. I pretended that this was all part of the plan and moved my hunters up behind a low hill.

First contact


Og send dogs in. Push big food into swamp or over edge. Big food attack dogs.

While Steve was moving his troops forward I used my few activation points to send my dogs forward with a view to driving the mammoths into the swamp or towards the cliffs on the right of the table. The mammoths attacked my dogs, who fortunately survived. I think I must have had particularly irritating yappy dogs because every time I tried to drive the mammoths with my dogs, the dogs were attacked.

Hunters slow. Og lose patience. Og attack big food and kill it. Og do happy dance. Ug not happy.

With Steve's hunters advancing rapidly and low activation points I took a risk. Og is a hero and has a fifty/fifty chance of dying if he attacks a mammoth. I charged him in and he won, killing a mammoth that Steve's dogs were about to worry. Meanwhile my dogs were attacked by a different mammoth and Steves hunters were trying to bring a mammoth down with slings and bows.

First Blood!


Og happy. Og kill more big food. Ug very not happy.

While Steve's dogs worried more mammoths and my dogs irritated them more, Og attacked and killed another mammoth, and still survived! The rest of my hunters were still lurking behind their hill, refusing to come out, while Steve's hunters were advancing rapidly towards the watering hole.

Og 2, Ug 0


Og happy. Big food step on Ug hunters. Squish! Ug dogs squish too. Og not happy. Ug kill big food. Ug hunters kill big food. Og hunters still hide.

Then suddenly Steve's hunters started to get lucky. Well, sort of. First his slingers got too close to a mammoth, which killed them. On the same turn his dogs disappeared under mammoth feet too. But, shortly after that Ug, Steve's hero, and his spear-armed hunters both killed mammoths. The scores were tied and it was going to come down to the final mammoth.

Ug and his hunters hard at work


Og race Ug to last big food. Og swift as wind. Ug slow like mud. Og kill big food. Og new big man. Og make Ug cook dinner.

With only one mammoth remaining and the scores tied, our heroes were the closest to the last mammoth, so we raced as fast as we could. Og got there first and, wildly improbably, killed his third mammoth, while his hunters finally started to come out of hiding. Victory to me!

Last mammoth standing


Conclusion
This was a brilliant game. Although we got a couple of things wrong at the start, largely from not reading the rules properly, we did manage to get things sorted out and we had the rules working properly by the end. We both had a great time and the result was very close to the wire. The reaction tests for the mammoths worked well, although interpreting how they should be adjudicated sometimes required some thought because of the presence of lots of humans in the area. We shall definitely play this one again, but next time we plan to hunt dinosaurs!

Afterword
The game took about an hour and a half in total, so we had time for a game of Pirates afterwards, which Steve won. I did not photograph that because of the lack of a suitable seascape, but I plan to sort out that issue later and produce a battle report for Pirates next time we play. It was a good game and the rules were surprisingly subtle for a simple game. I definitely need more ships for next time though. Good job The Works in Beverley is selling them off very cheaply.